
Revell HMCS Snowberry Flower Class Corvette
This is the fourteenth part of the Revell HMCS Snowberry Flower Class Corvette 1/144 Scale RVG 05132
I’m very excited about this stage of the build, and in this post, I’m going to be weathering the Snowberry. All of that chipped paint is about to get dirtied up with grime and rust.
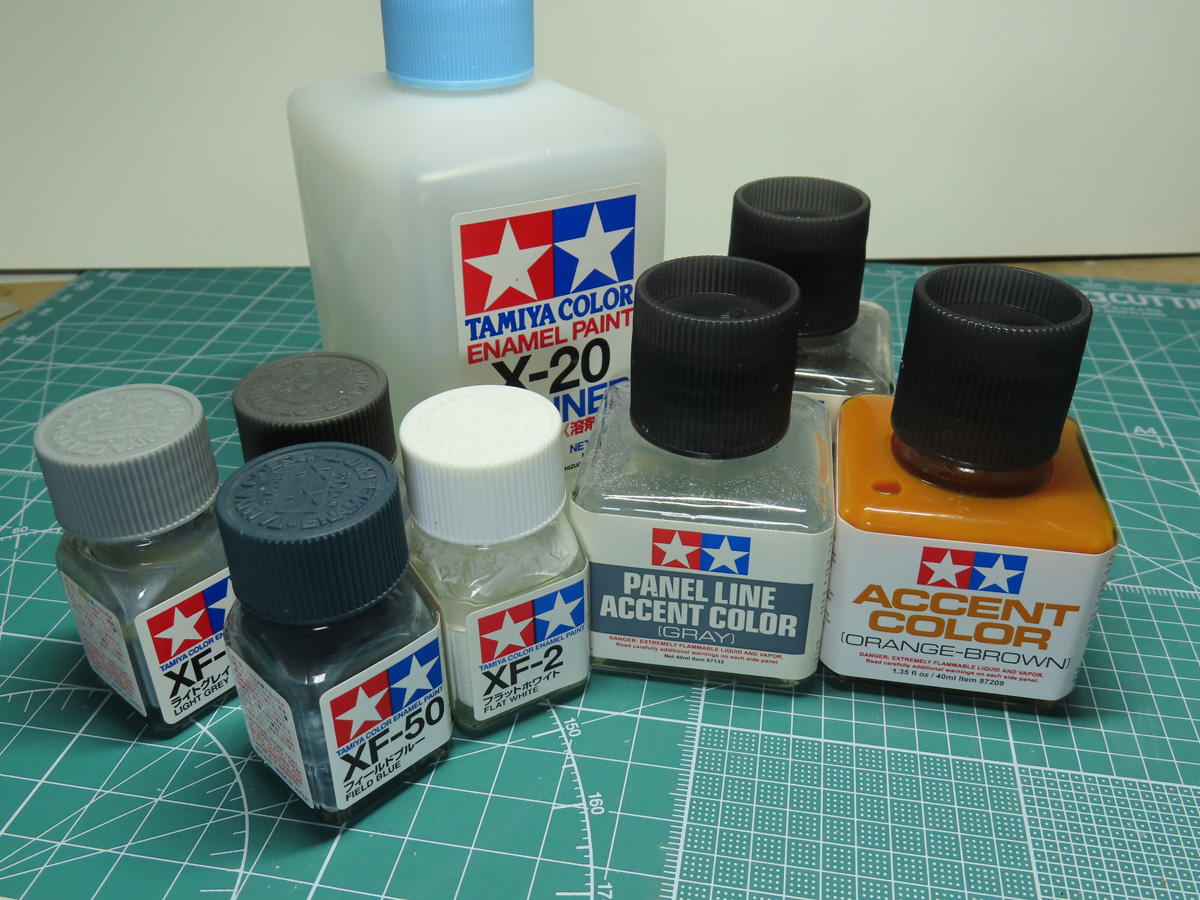
For the most part, I’m going to be using Tamiya Enamel paint products, but there are dozens and dozens of weathering products out there on the market, just waiting for your imagination. I also don’t want to go too overboard with the weathering, I’ll keep it a bit simpler for this scale.
Sometimes, too much weathering is bad as it can overwhelm the subject, and my plan and hope is to find that just right balance to give the effect that the Snowberry has been out at sea for a while now.
Before I started weathering, I decided to address an issue from the previous post, and that was the oddly elevated main gun platform.
I very, very carefully pried it off from the base, and to my relief, everything remained intact. I then took a cutting tool into my Dremel and carefully carved out the plastic around the square peg for the platform.
The platform was then glued back into place with some BSI CA Super Glue. It’s still sitting forward for some reason, but it’s a lot better than before. At this point, I can’t tell if this is an error of mine or a fault with the kit. But I feel I’ve done all that I can without risking potential damage to this kit.
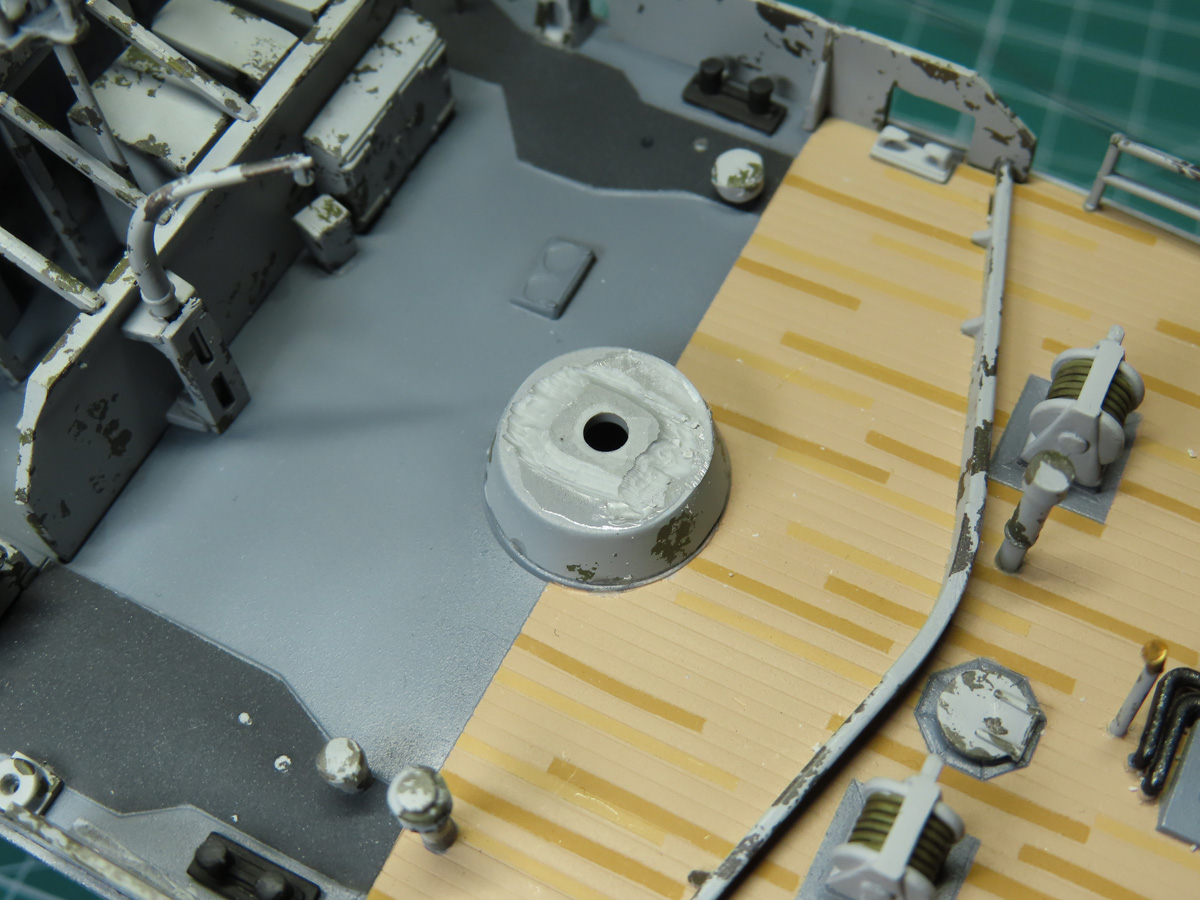
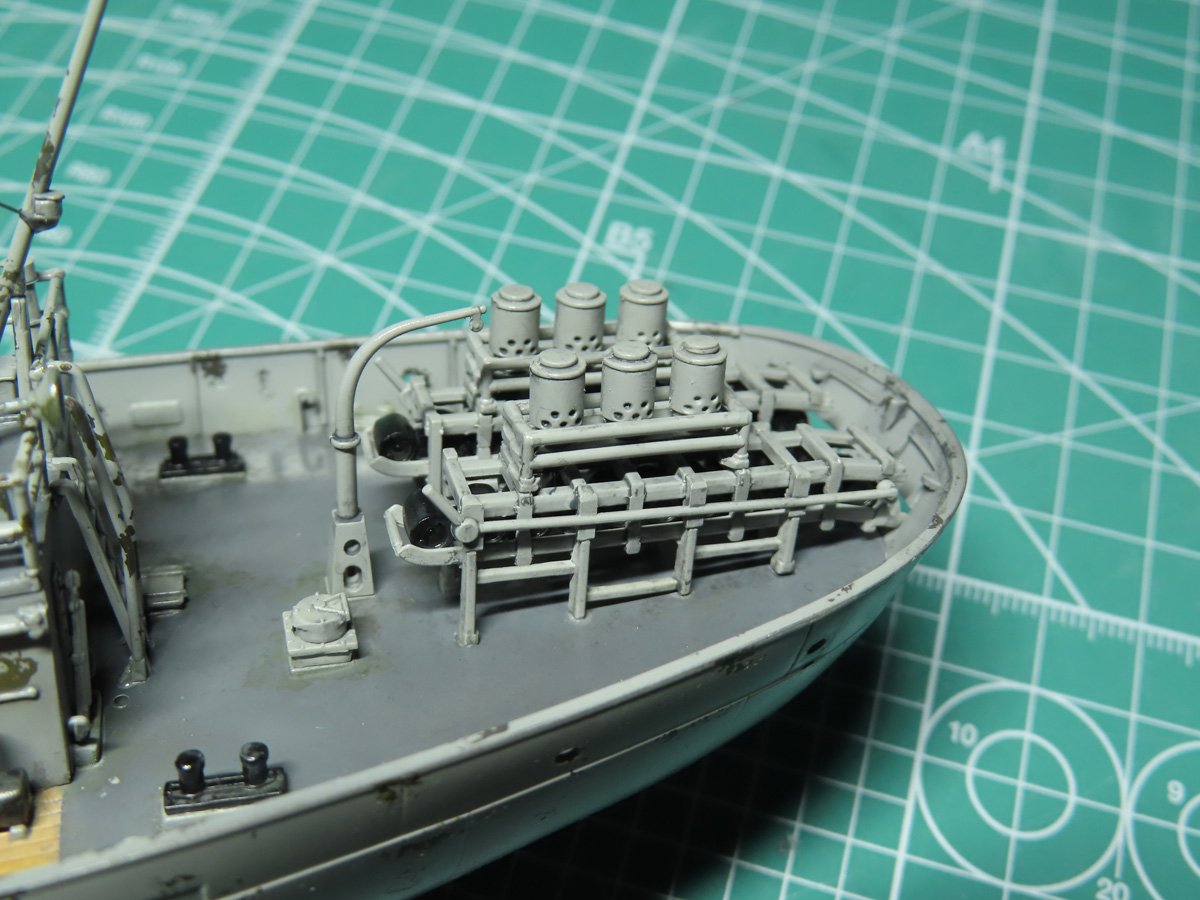
I want to tackle the weathering process in 3 stages, and the first stage is to weather the deck. This would be subject to a lot of water and the crew walking all over it.
I first airbrushed a clear coat over the entire model, and I used the new AK Interactive Gloss Varnish RC803. This gloss was pretty impressive, just 2 light coats, and I had an amazing reflective gloss finish, perfect for weathering.
Using a wide brush (specifically the Tamiya Modeling Brush 87047), I stippled Tamiya Panel Line Accent Color -Dark Grey- all over the deck surface. A few drops of the Dark Grey were placed into a Mr. Hobby Paint Tray. These panel washes are already pretty thin, but I wanted it to be a bit thinner so that the enamel wash would flow easier around the model.
So I added 2 drops of Tamiya Enamel Thinner to the wash, and I began the process of stippling the paint all over the deck. Unfortunately, in this picture, it isn’t as noticeable, and it blends in quite a bit with the darker grey deck, but this is just the first layer.
The next colour I added was Tamiya Panel Line Accent Color -Dark Brown- and this was stippled over top of the Dark Grey, nicely blending the two colors together.
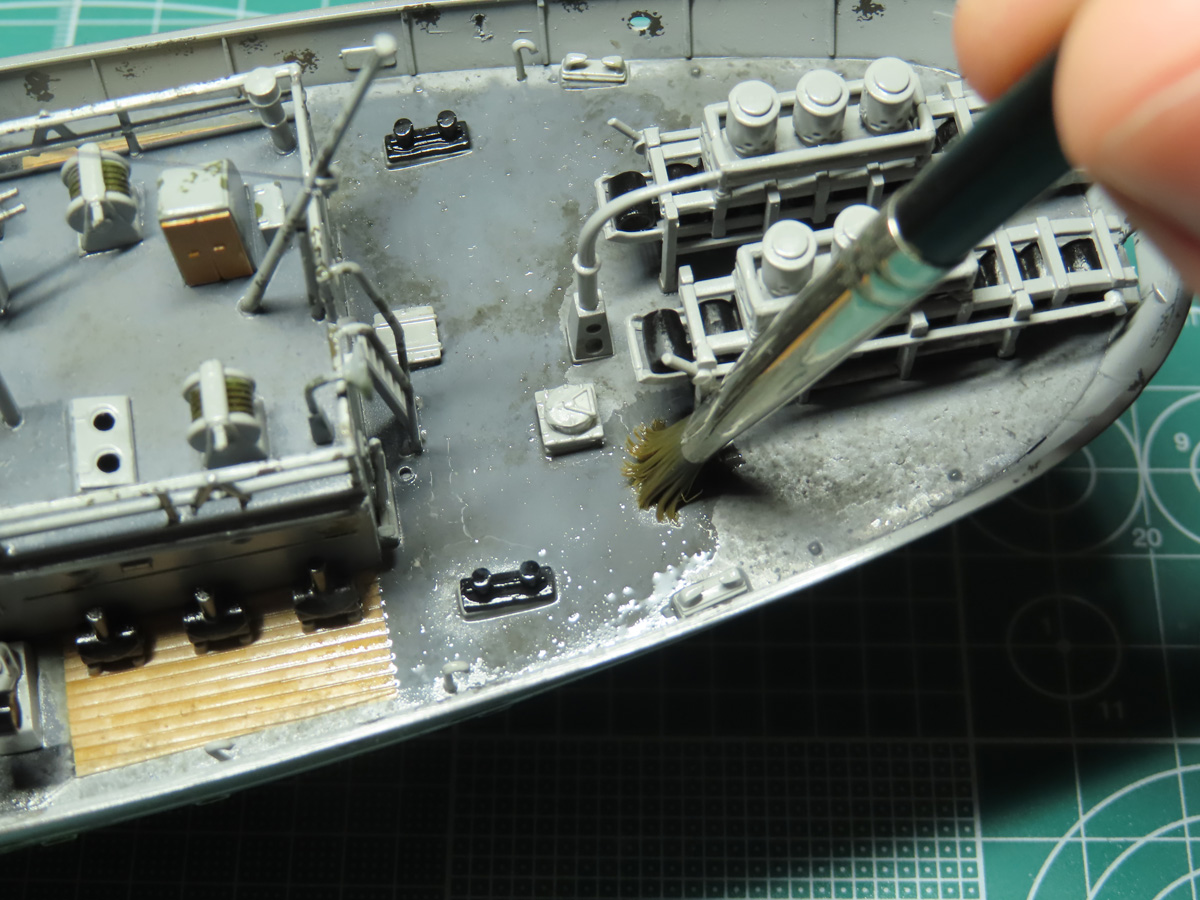
After the paints had dried for a while (about 1-2 hours) I took my Tamiya Brush and dipped it into some Tamiya Enamel Thinner. I then stippled the entire deck, removing some of the excess wash and further blending the colors together.
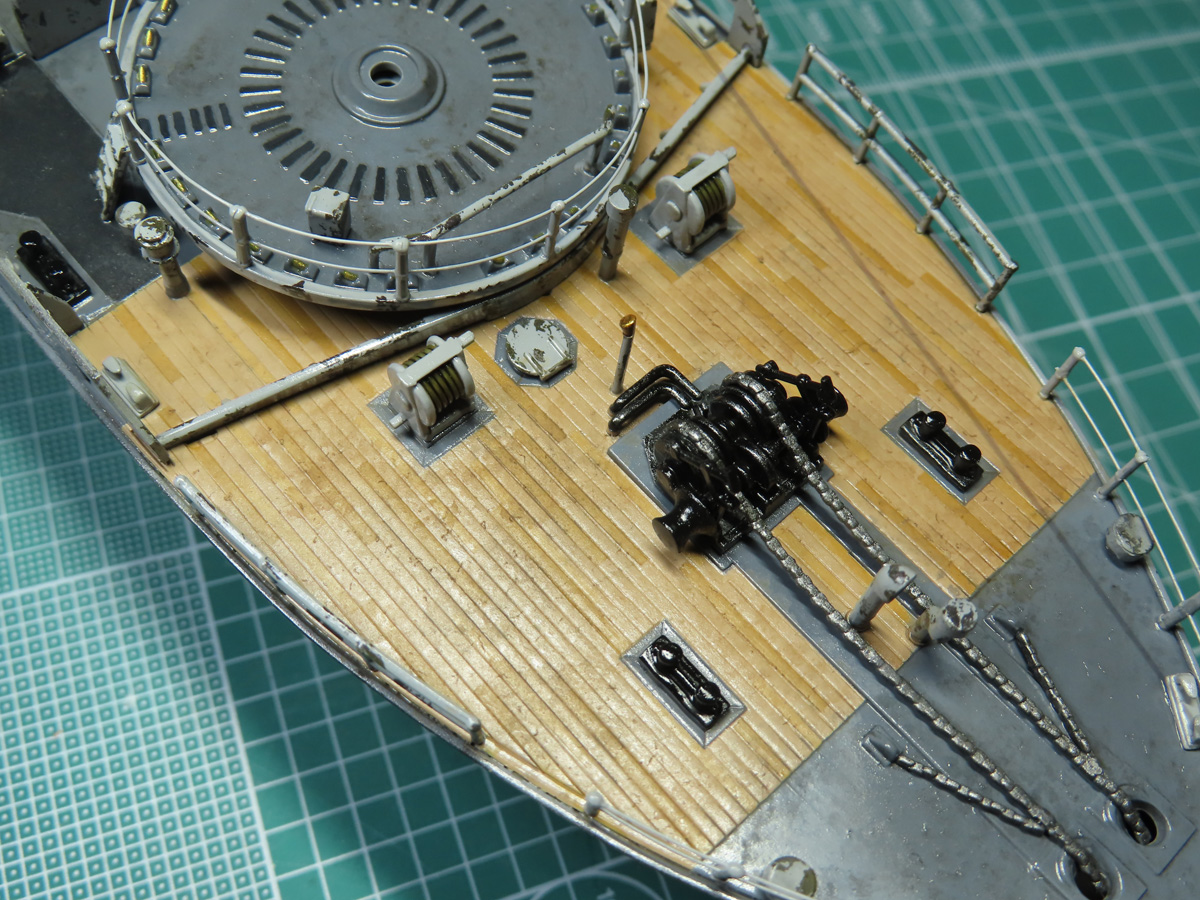
I didn’t want the wooden deck sections to be weathered the same way that I had with the grey deck. I added a few dabs of the Dark Grey paint, just to dirty it a bit. And then I stippled on Tamiya Panel Line Accent Color -Brown- and this did a nice job at highlighting the panels of the deck.
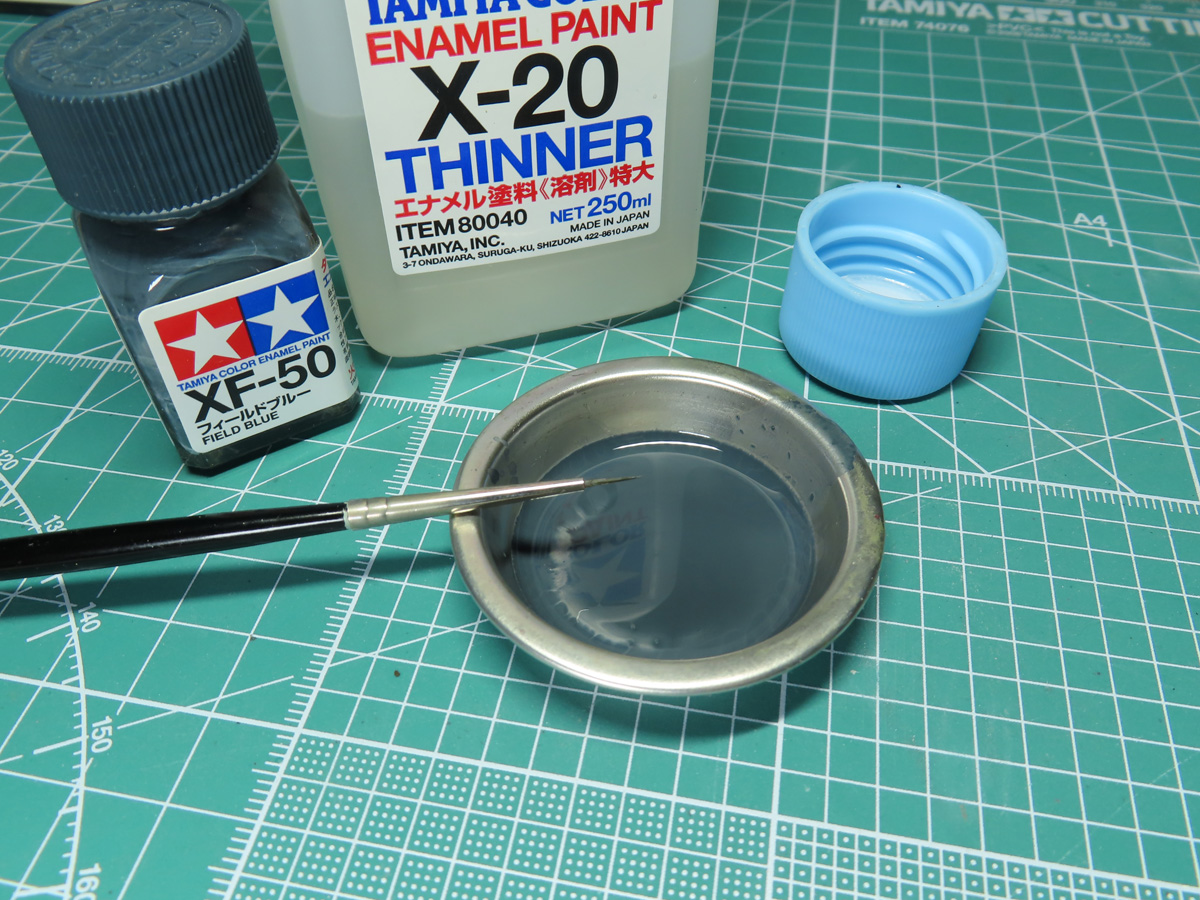
The nice thing about enamel paints is that you can basically use any color and turn it into a specific wash for weathering. Here I’m using some Tamiya XF-50 Field Blue, and I’ve thinned it with some X-20 Enamel Thinner.
When you are doing an Enamel wash, it’s best to have a good base coat to work from. If you are using Enamel Paints for your model, then the thinned enamels will remove your paint. I’ve even had some acrylics react poorly to enamels.
Your best bet is a good gloss coat. I like to use Lacquer Clears, like AK Interactive Gloss Varnish RC 803, or Tamiya LP-9 Clear, and Mr Color 46 Clear. But you can use Acrylic Paints as well. The benefit of lacquers is that they dry harder, and this protects the underlying paint.
The Gloss paint also dried much smoother on a microscopic level. This will allow you to easily use the paint and remove the excess. It will also prevent staining, which could occur.
I used the XF-50 Field Blue around some of the edges of the bridge floor to help highlight those details.
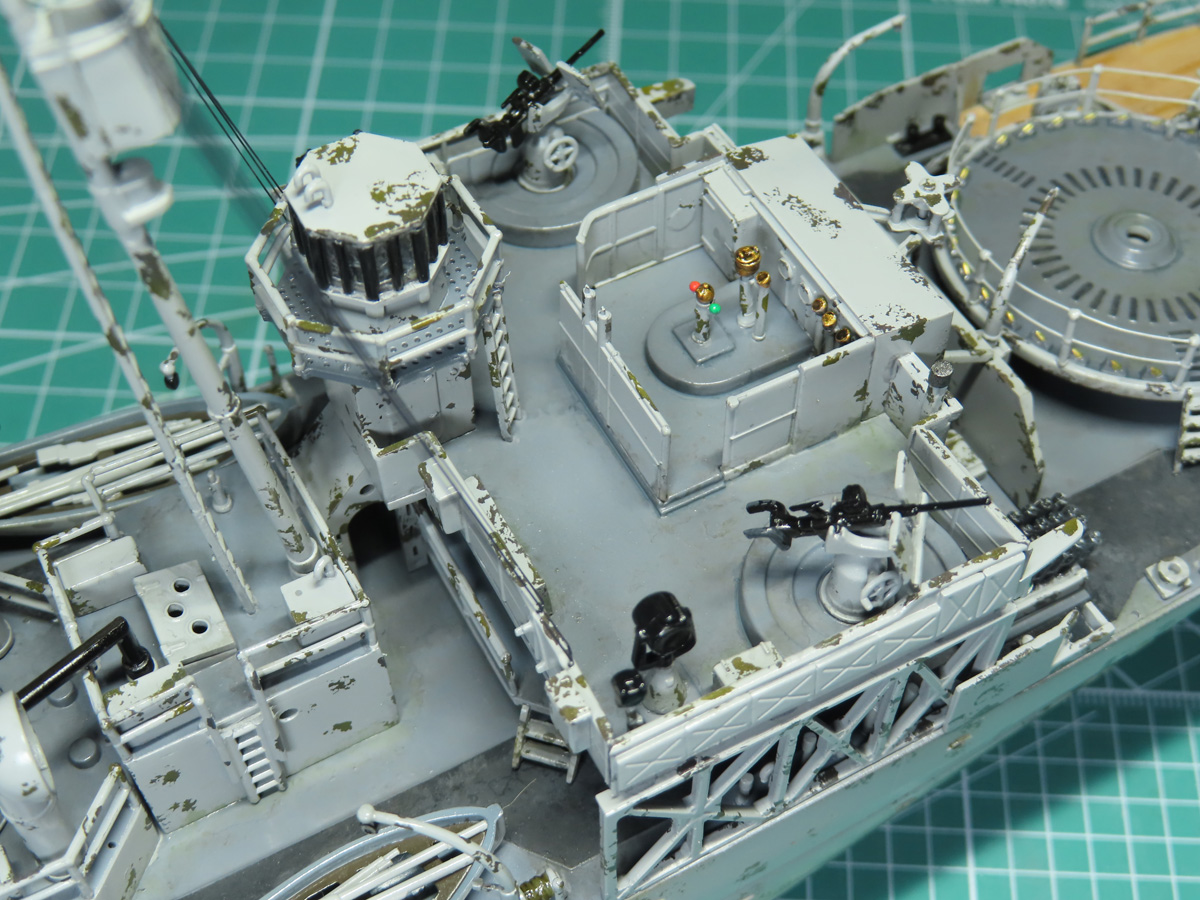
I wanted to add one more color to the edges all over the ship, and for this, I used some XF-13 J.A. Green. The green was painted all around the bottoms of the railings and the structures, and it provided a very contrast to the rest of the decks’ weathering.
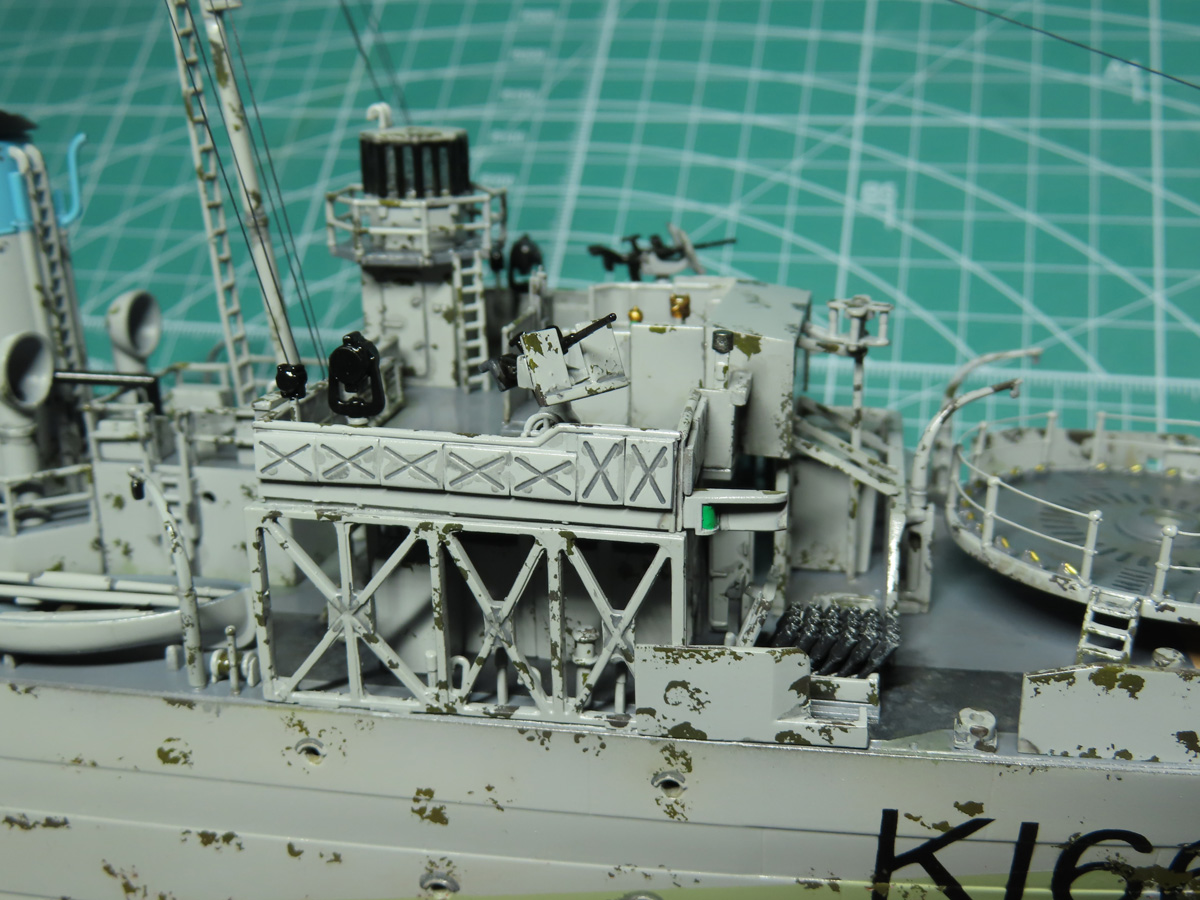
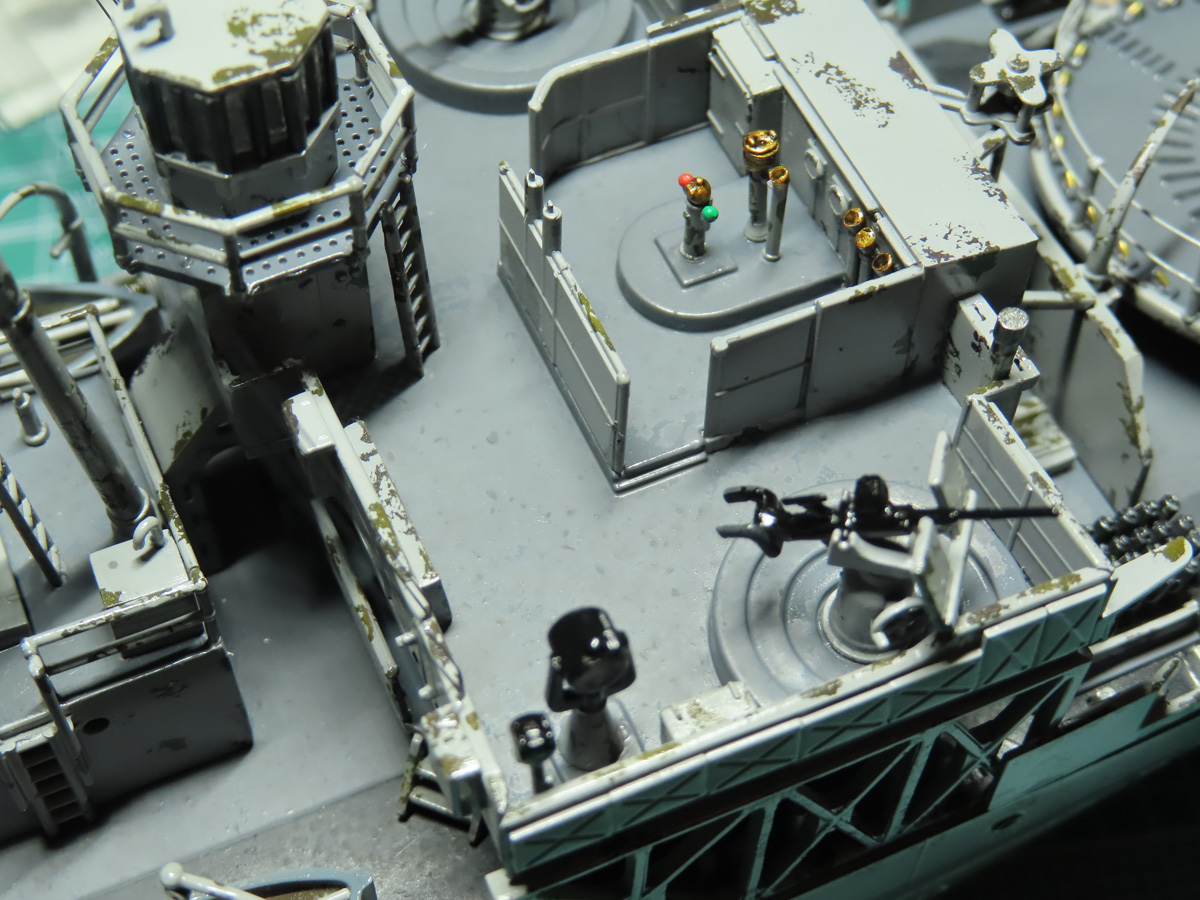
Now that I’m happy with the deck, I’m moving onto Stage 2 of the weathering, and that is to paint all of the Sky Grey structures.
I used Tamiya Panel Line Accent Color -Dark Grey- and I brushed a very liberal amount of the paint all over the Sky Grey. This wash is simply meant to highlight the various details that are hidden around the chipped paint and Sky Grey.
I cleaned the excess wash with a cotton bud lightly dipped in Tamiya Enamel Thinner. And for the more difficult places, I used a dedicated paint brush with slightly stiff bristles that does an excellent job at removing the paint.
You can see how the was really brings out the smaller details, especially on the smoke screen chargers on top of the depth charge racks.
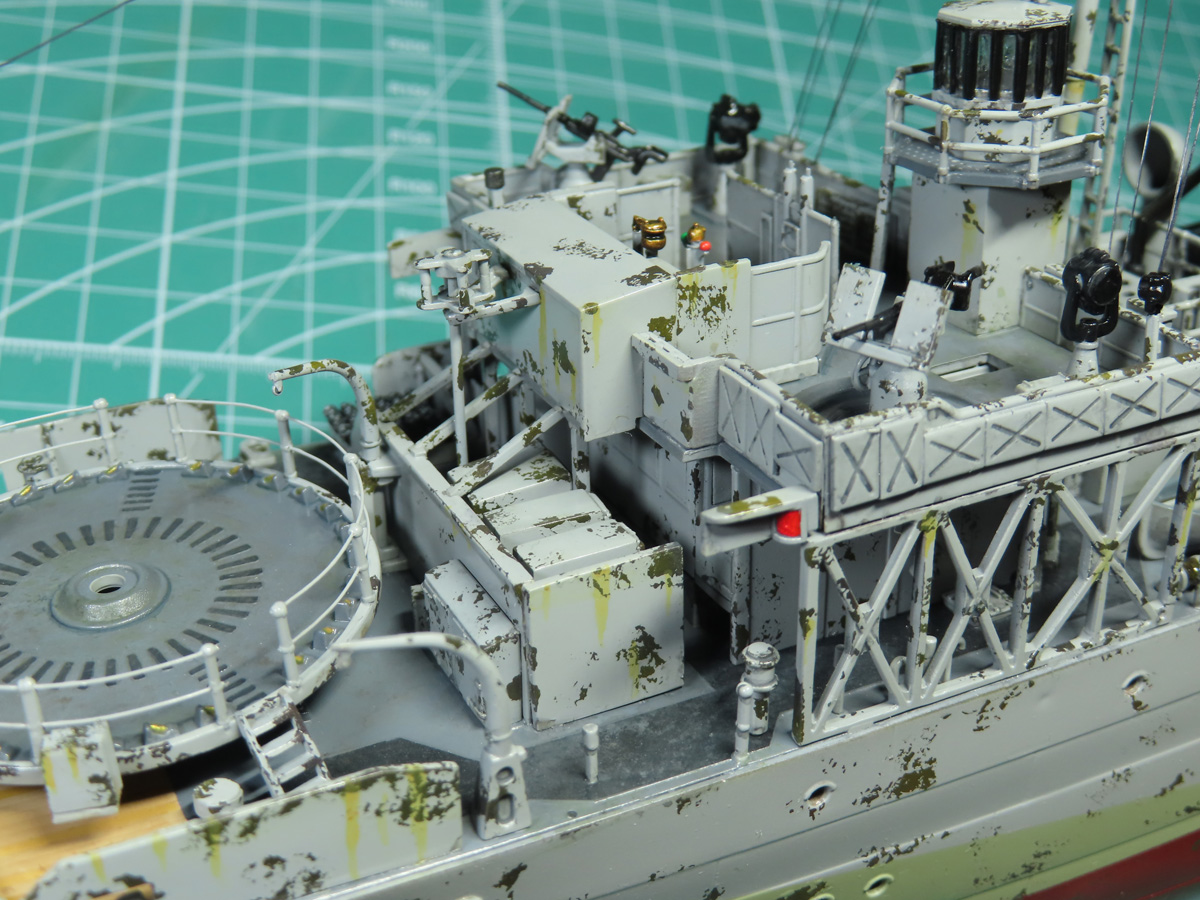
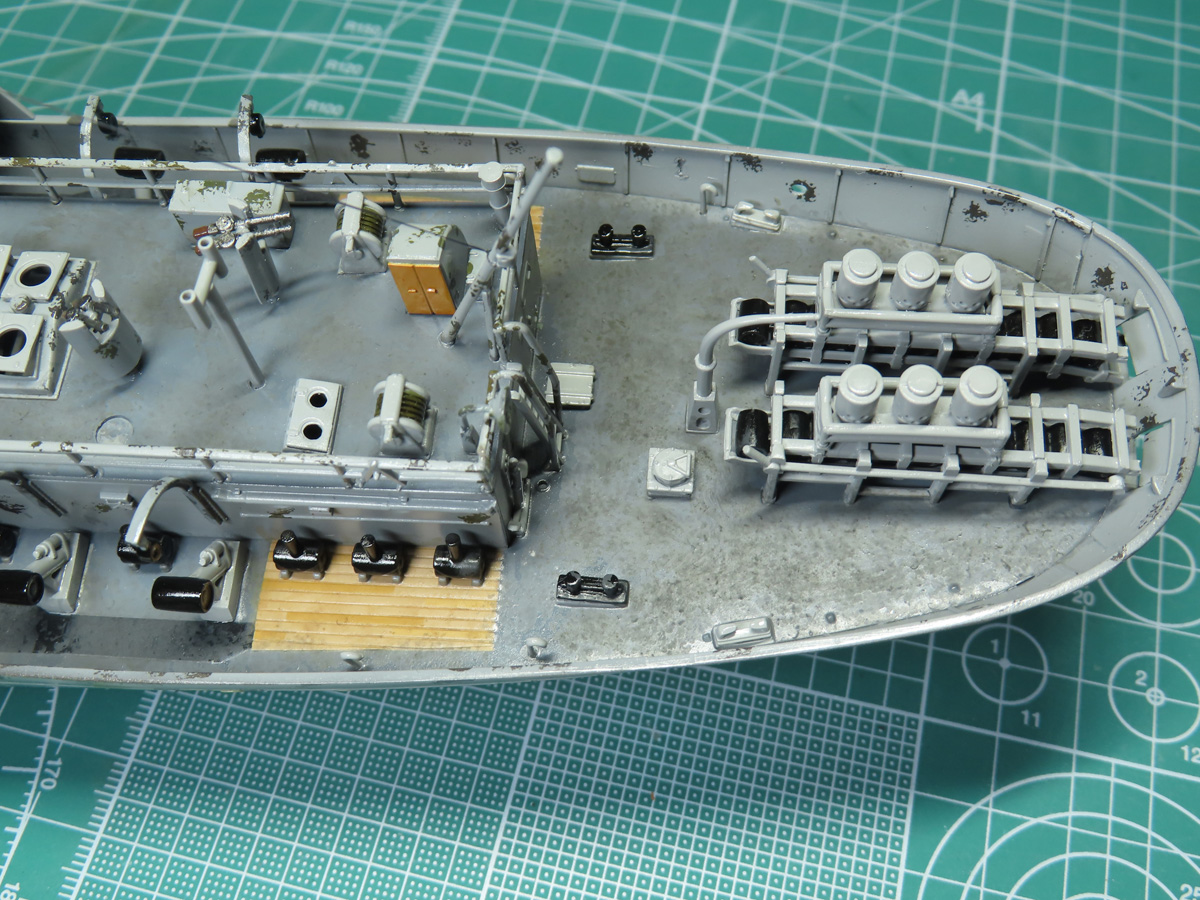
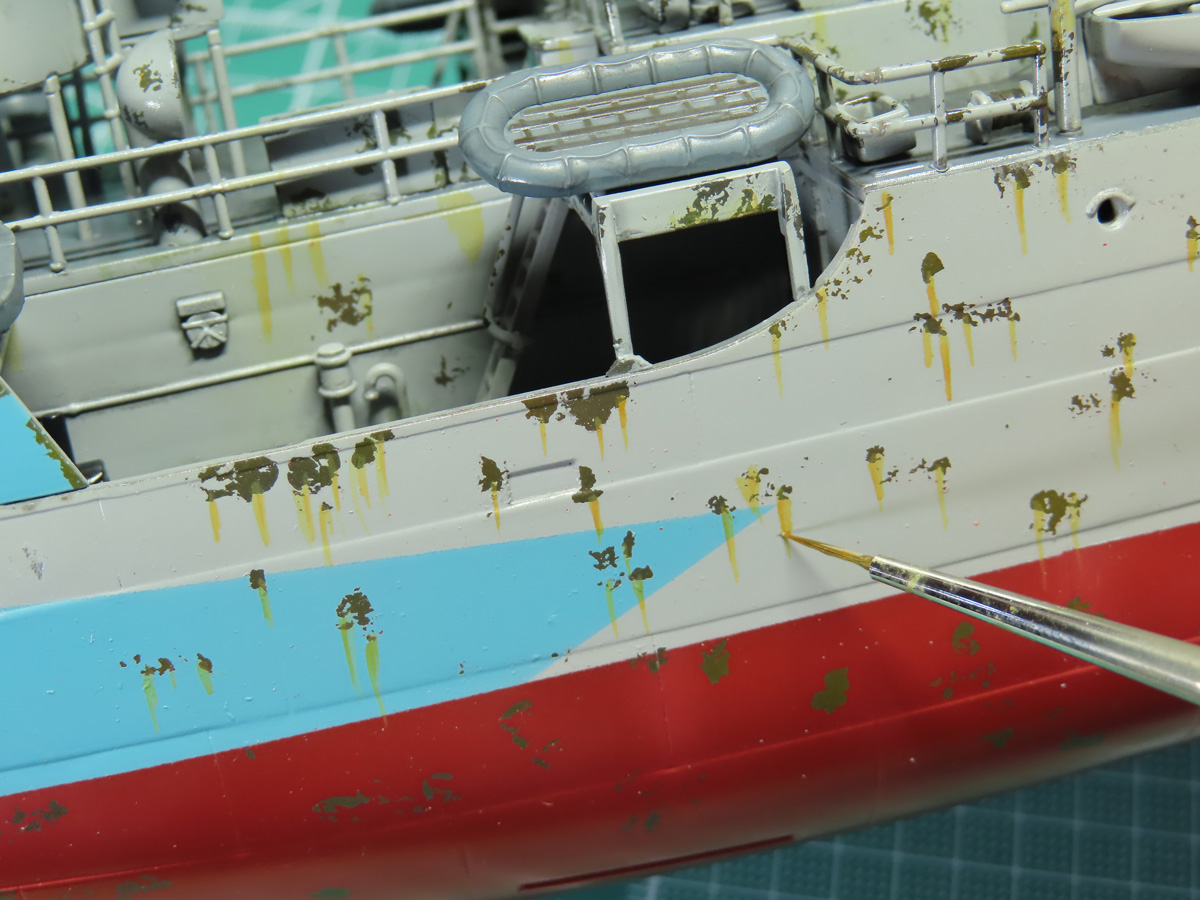
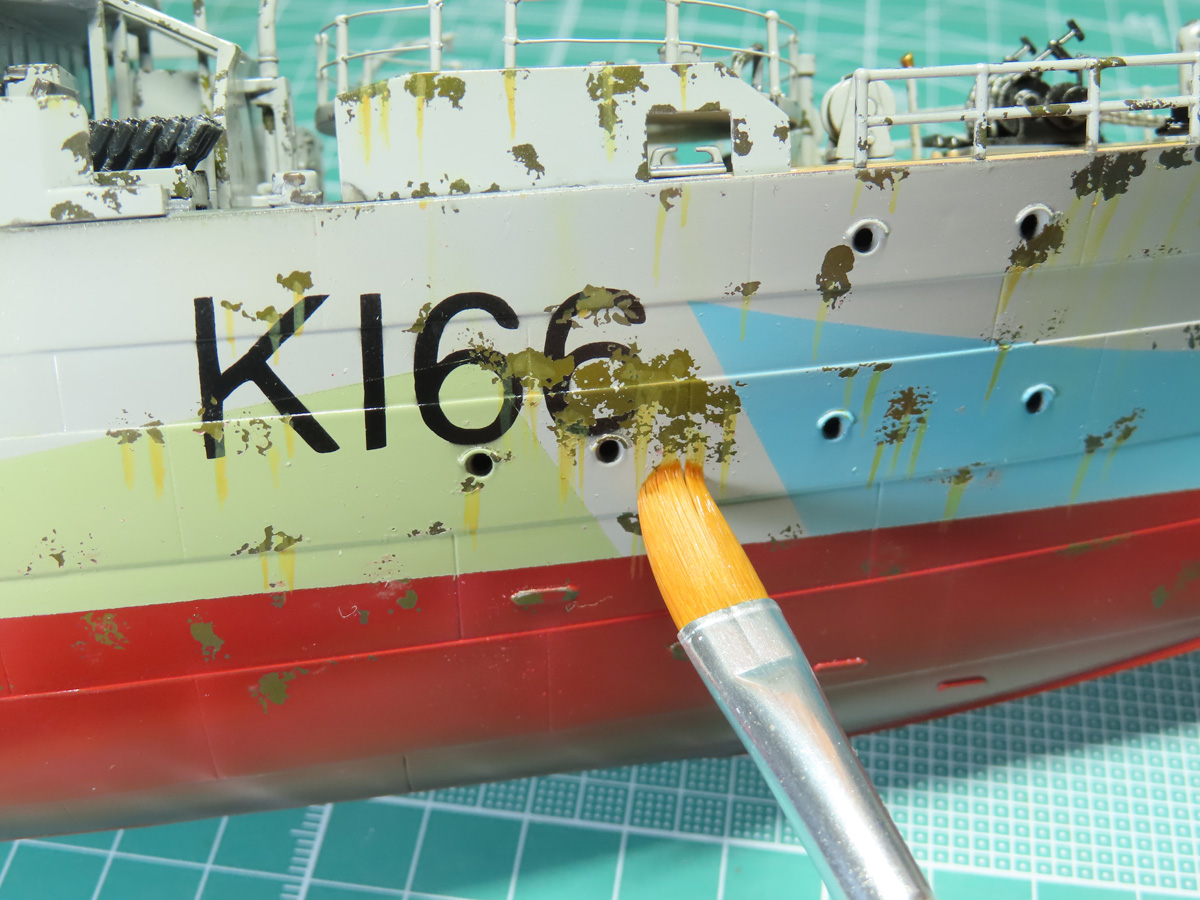
Stage 3 is to add on all of the rust streaking to the ship. I’m going to use Tamiya Accent Color -Orange Brown- for this effect. This paint was designed by Tamiya to be used as a quick wash for faces. Simply paint a figure a flesh tone and then apply the Orange Brown to bring out the details. Tamiya also suggests using it for rust.
I used my very thin, pointed brush (Tamiya 87048) and lightly painted the streaks running down various sections of the ship. Starting from the top and quickly pulling the paint downwards so that it would taper to a point. After the paint had dried for a few minutes, I could go back and paint over the Orange, and a second or third layer would help darken the streaks and create a nice variety in the color tones.
I have to admit that I had some difficulty at times getting the brush at the right angle to paint on the effect, as there were a lot of parts in the way, so I had to be careful not to damage any of them.
Moving onto the hull now, I was able to rest my hand more, and I therefore had more control of the brush for painting on the streaking.
I mainly focused on exposed sections where the paint was chipped, as well as on the edges of the deck. This became a very fun process and within no time I had developed a rhythm and before I knew it the hull was all painted.
I looked at several sources online for reference, and I saw a few modern military ships that had very noticeable rust, and on other ships, the rust was all over the place. I thought that this would look dynamic to the project, but once I had finished adding streaks to the model, I wondered if it was accurate.
With the ship sailing, I imagine a lot of the constant water might wash away any rust, especially on the hull. Not to mention that all of the pictures I saw had the ships docked in place, standing still for a long period, and that this much rust might be an exaggeration. I’ll leave this accuracy to those of you who have been around ships and have more experience with this than me. But even if it is inaccurate, I still just think it looks pretty great.
I picked up this brush specifically for this project, it’s a very nice soft rounded brush (AK Interactive AK579) that was just right for pulling down and thinning some of the streaks.
I dipped this brush into the Tamiya Enamel Thinner, and I wiped off most of the thinner onto a tissue. I left just enough thinner so that the brush was basically damp.
Then I could take the brush and pull down the streaks, which helps to feather the paint a bit more, as well as create slightly longer, tapered streaks.
I thought about adding other colors to create different types of streaking. But once I had finished the rust, I thought that it was enough. I’ll think on this decision a bit more, but I might go back later on and add some Dark Grey and White streaks, but for now, I think it’s busy enough.
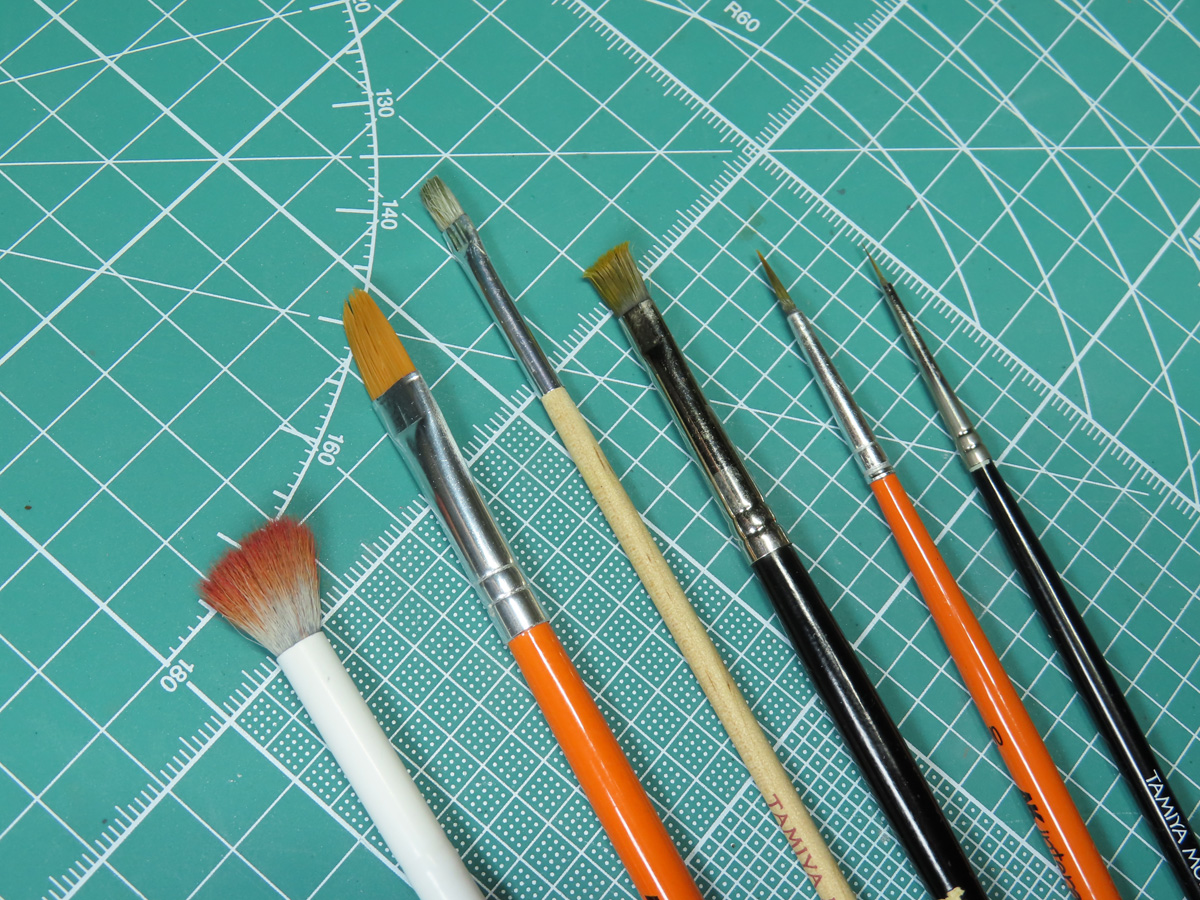
Before I wrap up this post, I thought I’d show you some of the brushes that I used for this project, as well as weathering in general. Most of these brushes are easily available on the Sunward Hobbies website, but they also have an impressive range of other brands’ brushes that you can select from.
Starting from the right and moving left.
Tamiya Modeling Brush HF (87048) is an inexpensive, pointed brush that is very reliable, and I end up using this brush on most of my projects.
AK Synthetic Brush 2/0 (AK Interactive AKB006). This is a good brush for painting on and removing the Tamiya Panel Line Accent Colors. It can hold quite a bit of paint, and the nice pointed tip allows me to get into tighter, difficult spaces.
Tamiya Modeling Brush HF (87047). This brush started out as a nice, wide brush, but I’ve repurposed it for stippling on the Enamel Washes. It does an excellent job of pulling the paints all over the subject and creating a nice weathered and dirty surface texture.
Tamiya Modeling Brush No.0 (87015). These bare wooden handle brushes from Tamiya are a much cheaper alternative to their more advanced line. In a way, these are temporary brushes for a limited use, but the bristles on this particular brush are stiffer, and this allowed me to stipple the washes into the tighter sections of the model.
AK Rounded Weathering Brush (Ak Interactive AK579). A great brush for pulling down and feathering the washes. It also does a good job of allowing you to slowly apply layers of paint to create gradual and varied tones in the colors.
Make-up Blush Brush. I found this for stippling on various enamel washes without applying a lot of pressure to the underlying enamels. I purchased this for weathering an F-14D Tomcat, the bristles on this brush are very soft, and with that, it creates a very unique texture with the enamels.
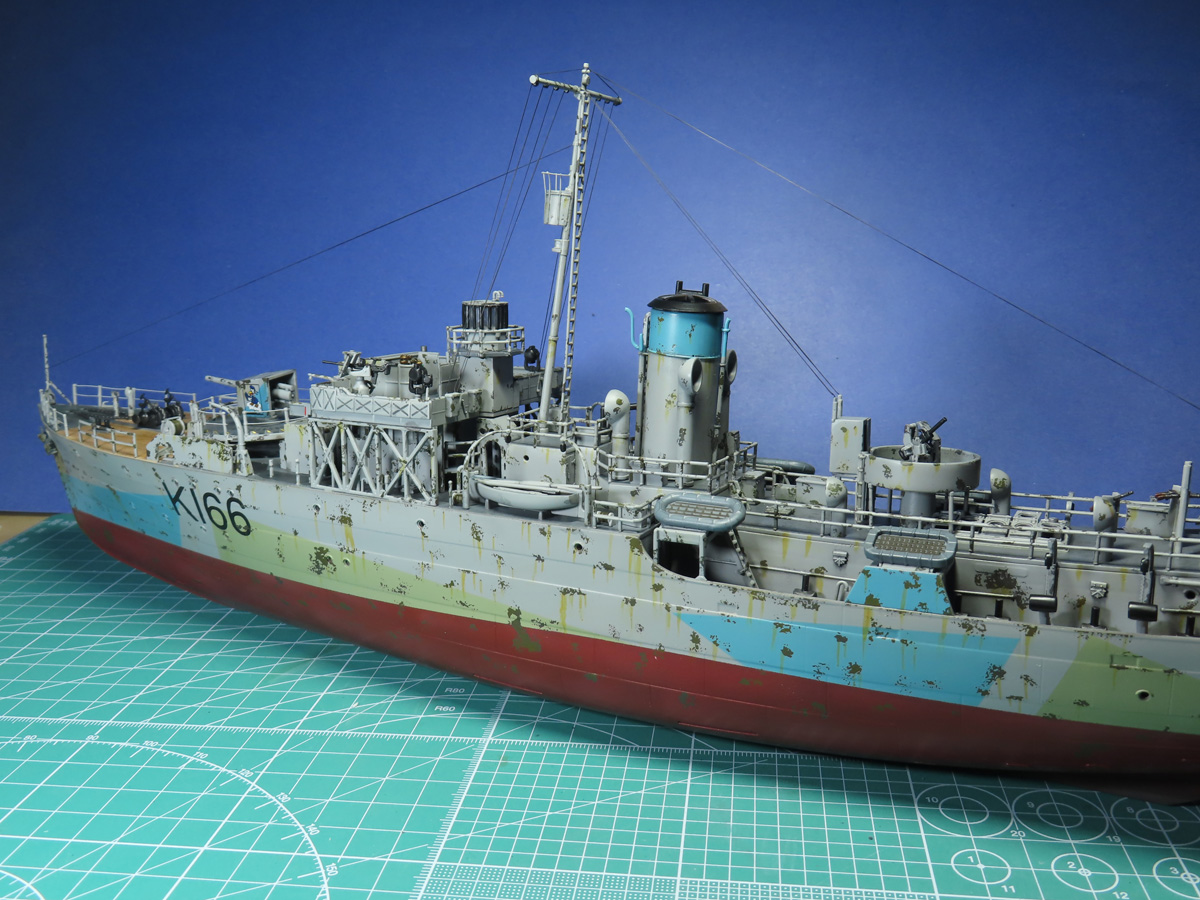
Finally, I sprayed a flat coat over the entire model to seal in the enamels and to protect the rest of the paint. I decided to try out AK Interactive Flat Varnish (RC801). But this flat came out really glossy for some reason, and I was left with a splotchy ship. So I went back and resprayed everything with Mr. Color 182 Flat Clear.
Now that the flat clear is added, this model is basically done, aside from the flag at the back. Sometimes adding a flat coat can diminish the weathering of enamels and pastels as some flat coats can be too overpowering. I had this concern when I applied the Mr. Color over the AK Interactive, but I think everything has stayed more or less the same color.
The next step is going to be creating the water effect, and finally putting the Snowberry out to sea. This has been one long project, and I’m very excited to see it posed in the Atlantic Ocean.
To be continued…
Jared Demes is a modeler from southern Alberta. He has been building models since he was 4 years old when his Dad first introduced him to the hobby. He has written for several magazines including, Fine Scale Modeler, Scale Aircraft Modeling, Phoenix Scale Models, and others. He has an interest in all modeling subjects, with a focus on WWII Japanese aircraft and Science Fiction.
Jared has won several IPMS awards for his modeling, and currently operates his YouTube channel rebelsatcloudnine, where he showcases model builds and product demonstrations.
First Post: Part 1
Previous Post: Part 13
Next Post: Part 15