
Tamiya North American F-51D Mustang
This is the sixteenth part of the Tamiya North American F-51D Mustang Korean War 1/32 Scale 60328 with RCAF Markings.
I’ve been a bit delayed as I’ve had to replace my compressor. I was looking forward to getting some painting done and to finally use the stencils I had cut up for this project. But when I turned on the compressor and tested my airbrush, I noticed that the pressure was greatly reduced from normal. I checked the airbrush and found no issues, so I thought there might be an obstruction in the hose.
When I reattached the hose to the compressor, I lost all pressure, and so I opened up the unit to discover that the interior air hose had been damaged, and it would be difficult to repair. Though I really like this compressor, I thought this would be the opportunity to look for something bigger and more powerful.
Things were looking good, but unfortunately, the delivery was delayed a few days, so I missed posting last week, and I’m more delayed with this project than I had anticipated.
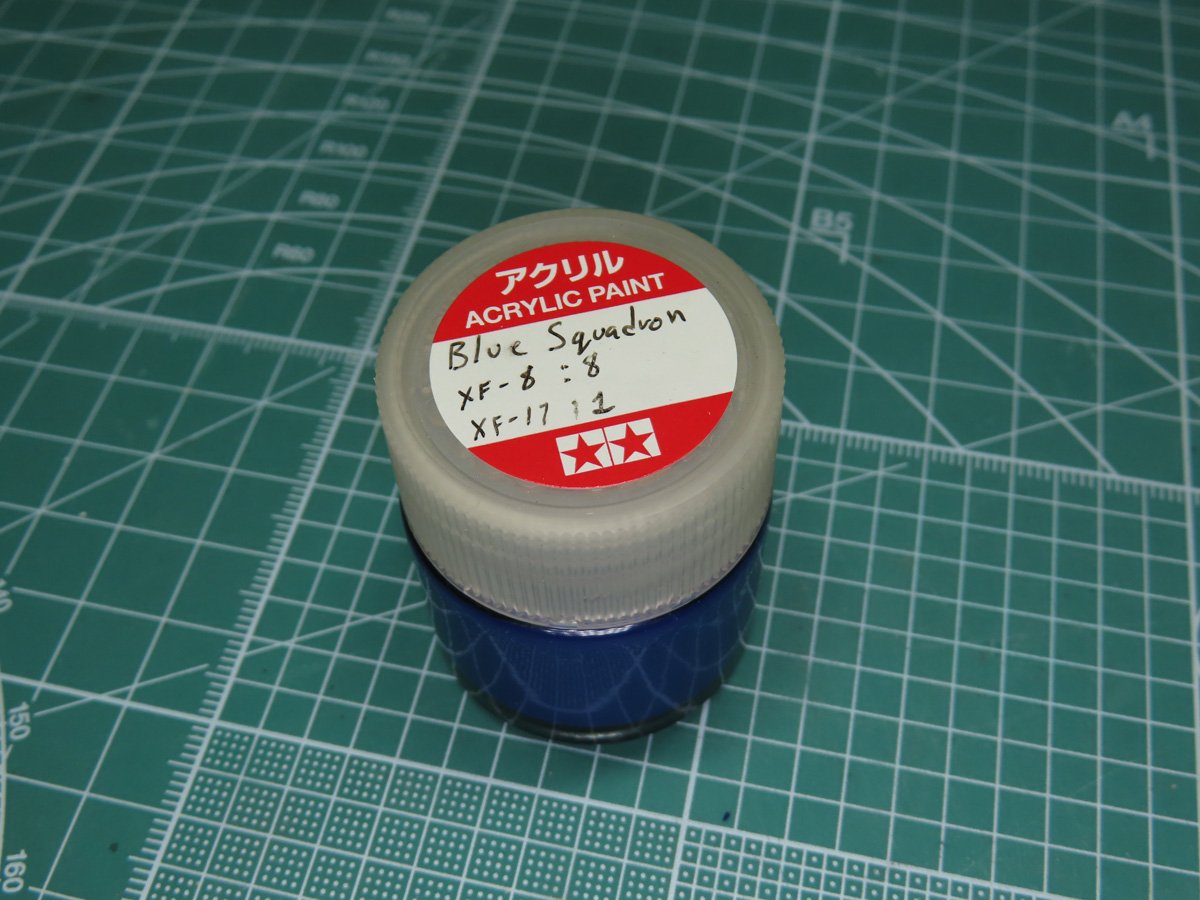
Before I begin applying the stencils and painting, I need to mix up a darker blue for the outer edge of the roundels. Now, a good color straight from the bottle is Tamiya X-3 Royal Blue. And though I really like the tone of this color, I’ve personally had issues with painting it in the past.
I’m going to use a custom color that I mixed up for the Blue Squadron X-wings in the movie Rogue One. This is 8 parts of Tamiya XF-8 Flat Blue, and 1 parts XF-17 Sea Blue.
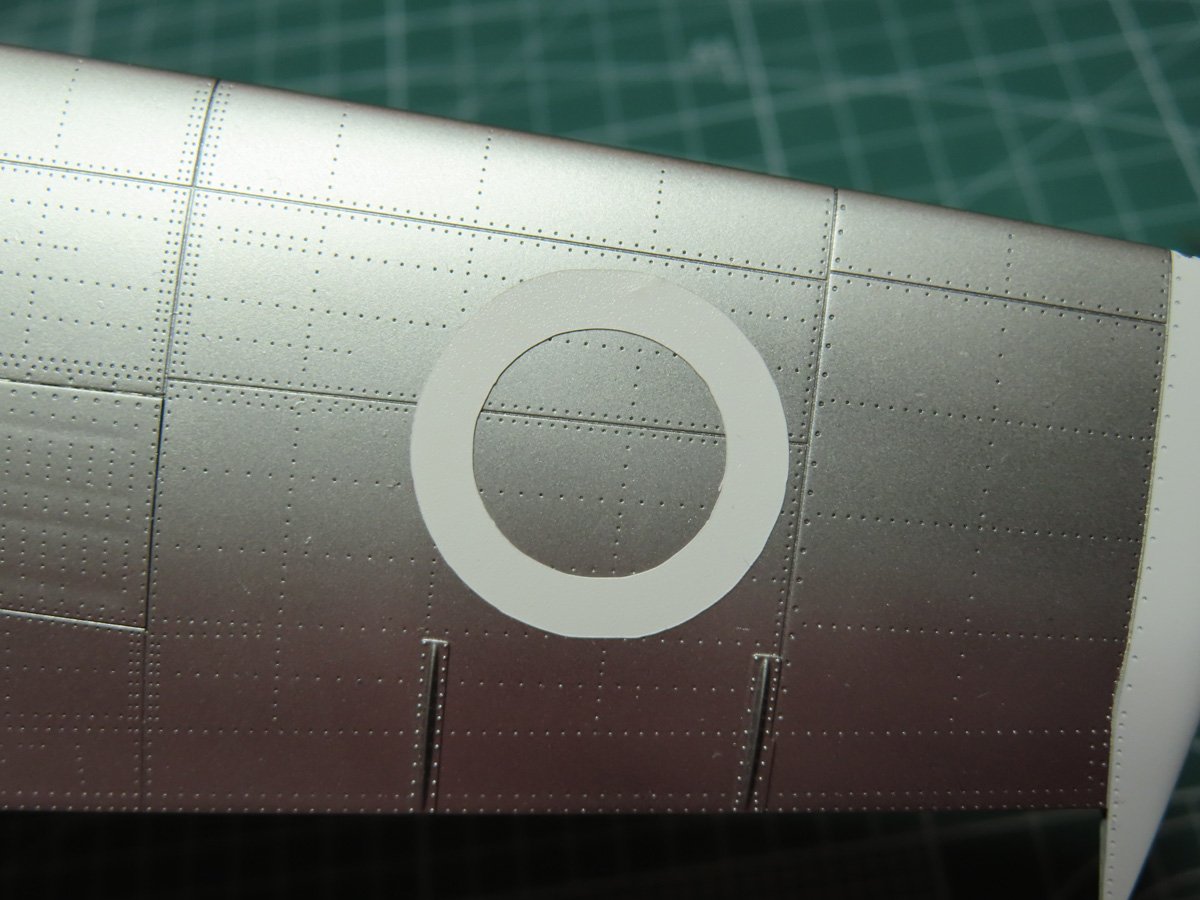
My brother was kind enough to cut out the stencils I needed for this project using his vinyl cutter. Stencils are great as they allow a much more realistic appearance to the model. With light painting, I can build up a nice layer and this will allow all the recessed details to remain.
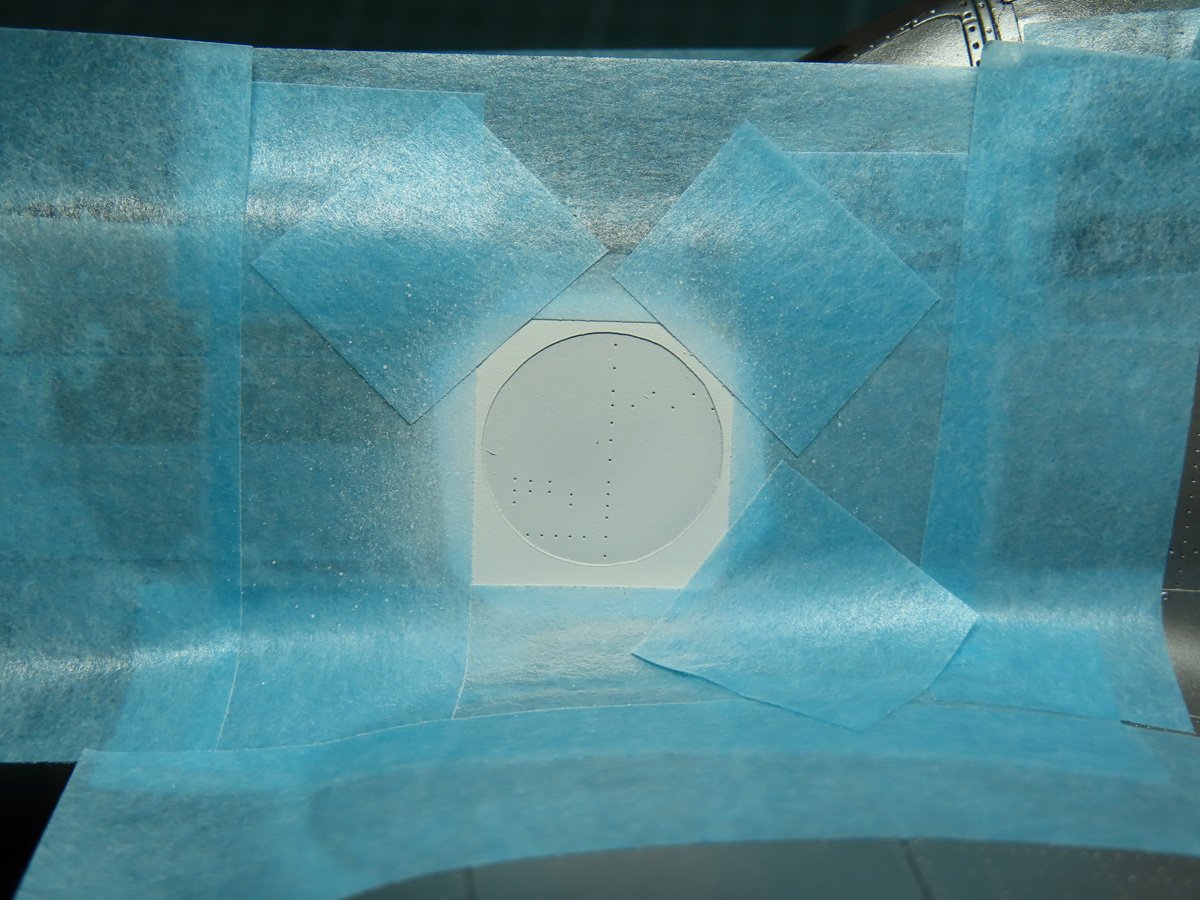
I began by temporarily placing the outer ring of the roundel onto the model. This would allow me to properly view the placement of the roundel.
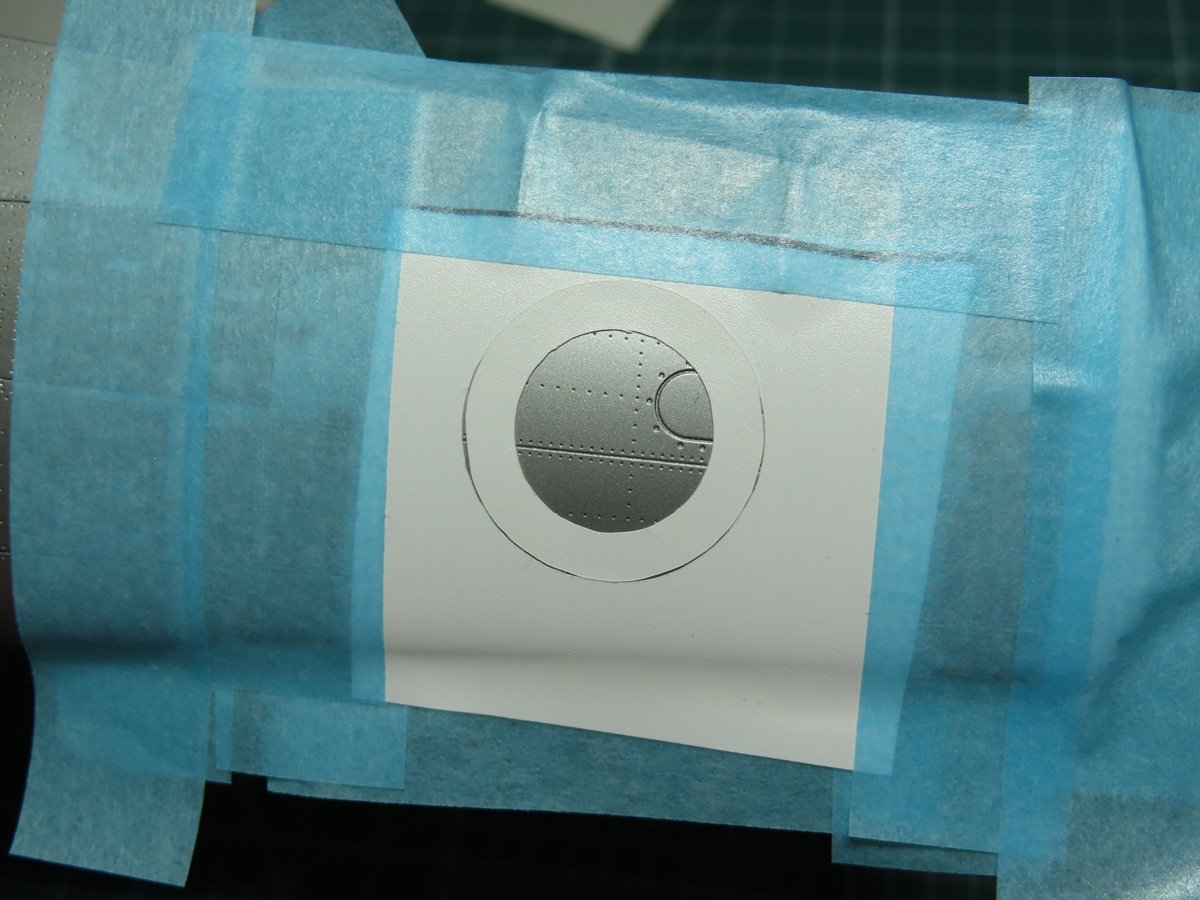
Once I was satisfied with the placement, I placed the outer section of the stencil down and then removed the outer ring of the roundel for painting. I added more tape around the stencil to prevent any over spray that might occur.
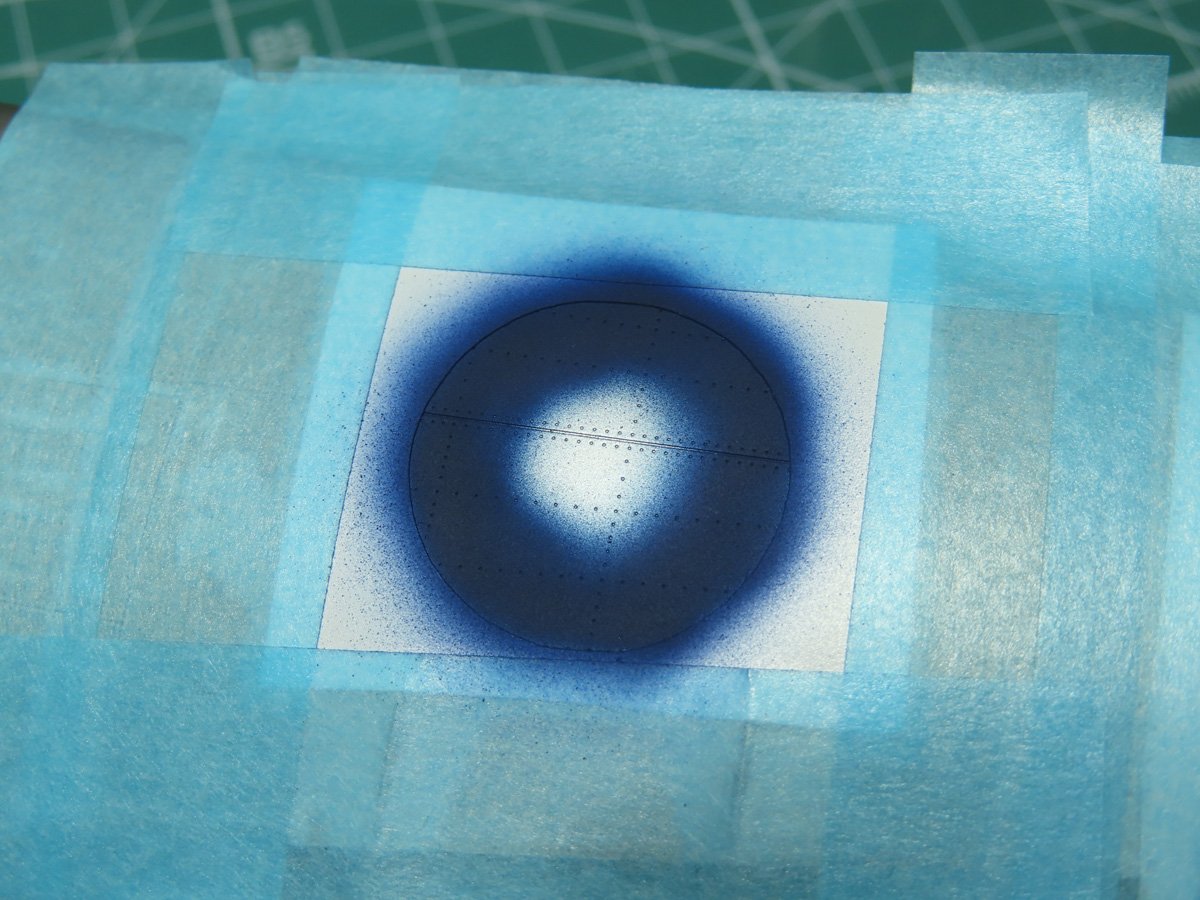
I then lightly sprayed on my custom Blue and gently layered on the paint until I had an even coating.
There are 6 roundels that need to be applied to this Mustang, so I added all 6 stencils to the model, and I would spray one light coat and then move on to the next one. By the time I had painted the last roundel, I was ready to move back and apply a second coat to the first one. By painting light coats, I could avoid paint buildup along the edges of the vinyl.
When you are painting stencils, be sure to apply enough paint to the edges of the stencils; otherwise, the stencils will look faded.
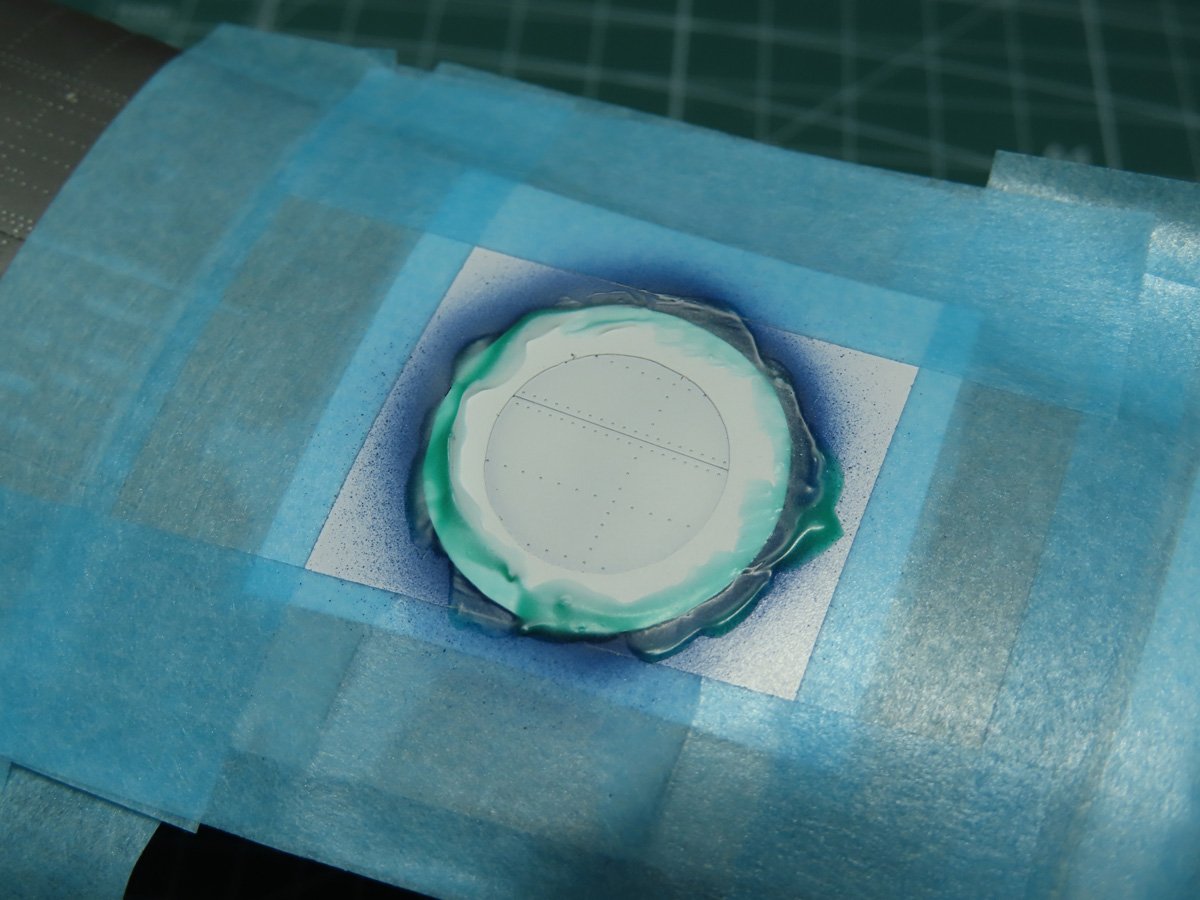
Once the Blue was dry, I reapplied the outer stencil, and as a precaution, I brushed a thin layer of Mr Masking Sol Neo to the edges to avoid any paint bleeding through.
I used Mr Color C62 Flat White for the center, and I had a beautiful white finish with just 3 light layers.

Lastly, the Maple Leaf was added to the center, and I was really excited to see this stage of the painting come together. These are the older style leaves that you will typically see on RCAF aircraft in the 1950s-60s. They were more traditional before Canada adopted a more symmetrical design.
For the red, I used Tamiya XF-7, as it’s nice to paint at lower pressures, and it’s quite bright, so they will stand out on the model.
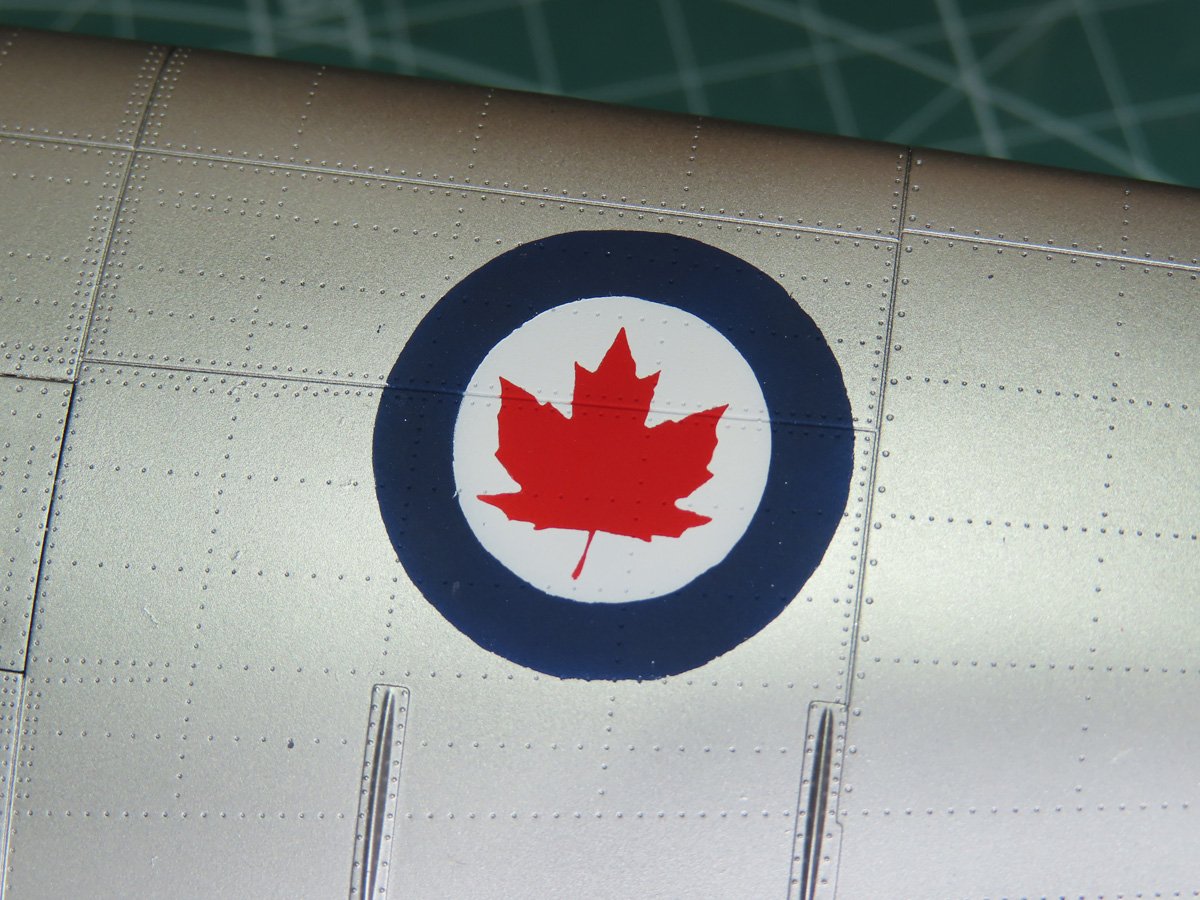
I carefully removed the stencils, and it revealed something beautiful!
To be completely honest, I wasn’t too sure that the cutter could make shapes as intricate as these leaves, but it proved me wrong. This is exactly what I was hoping for, and it’s very exciting to see this Mustang finally look Canadian.
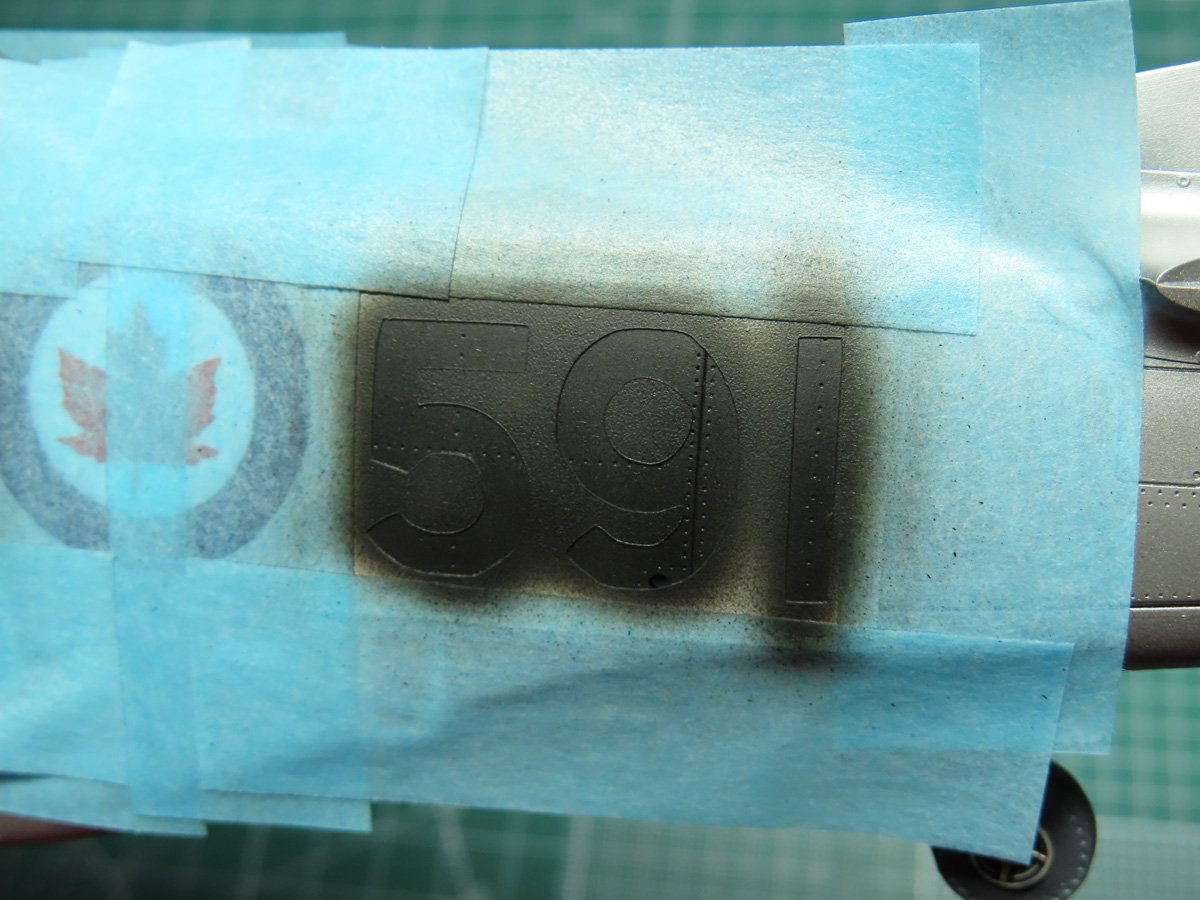
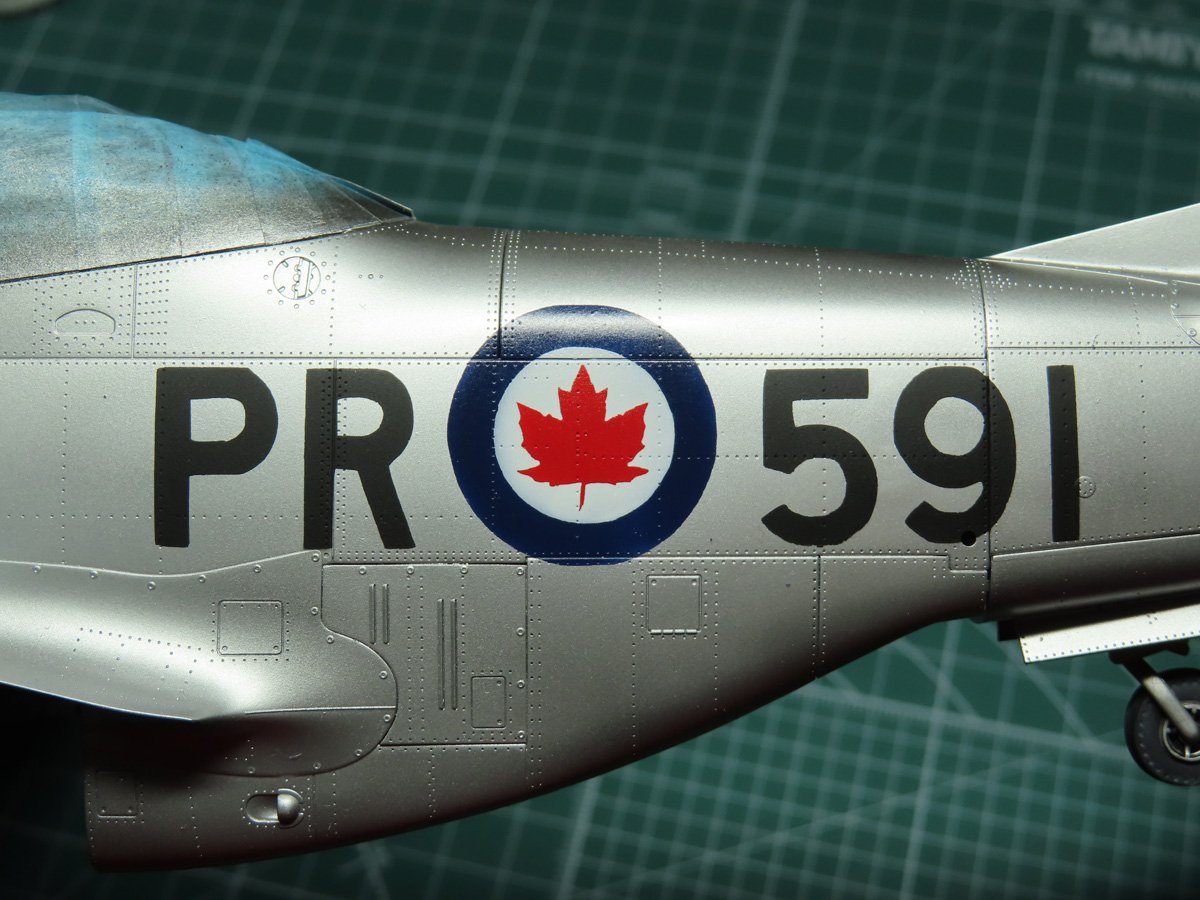
Now it was time to all on the squadron letters to the fuselage. But first I sprayed a Mr Color C46 Clear over the roundels. This was just to protect them from any possible damage, and once the clear had dried, I very carefully added the numbers and painted them with Mr Color C92 Semi-Gloss Black.
Some stencils are made out of Tamiya masking tape (kabuki tape), and other vinyls are quite thin. The material I’m using is on the thicker side, and this does have an advantage, as the stencils keep their shape quite well when you are handling them.
The disadvantage is that this vinyl and others can be very sticky, and if you aren’t careful, this can cause your paint to lift. This is one of the reasons I like to use Lacquer Paints with this project, as they bite down into the plastic more than Acrylic paints.
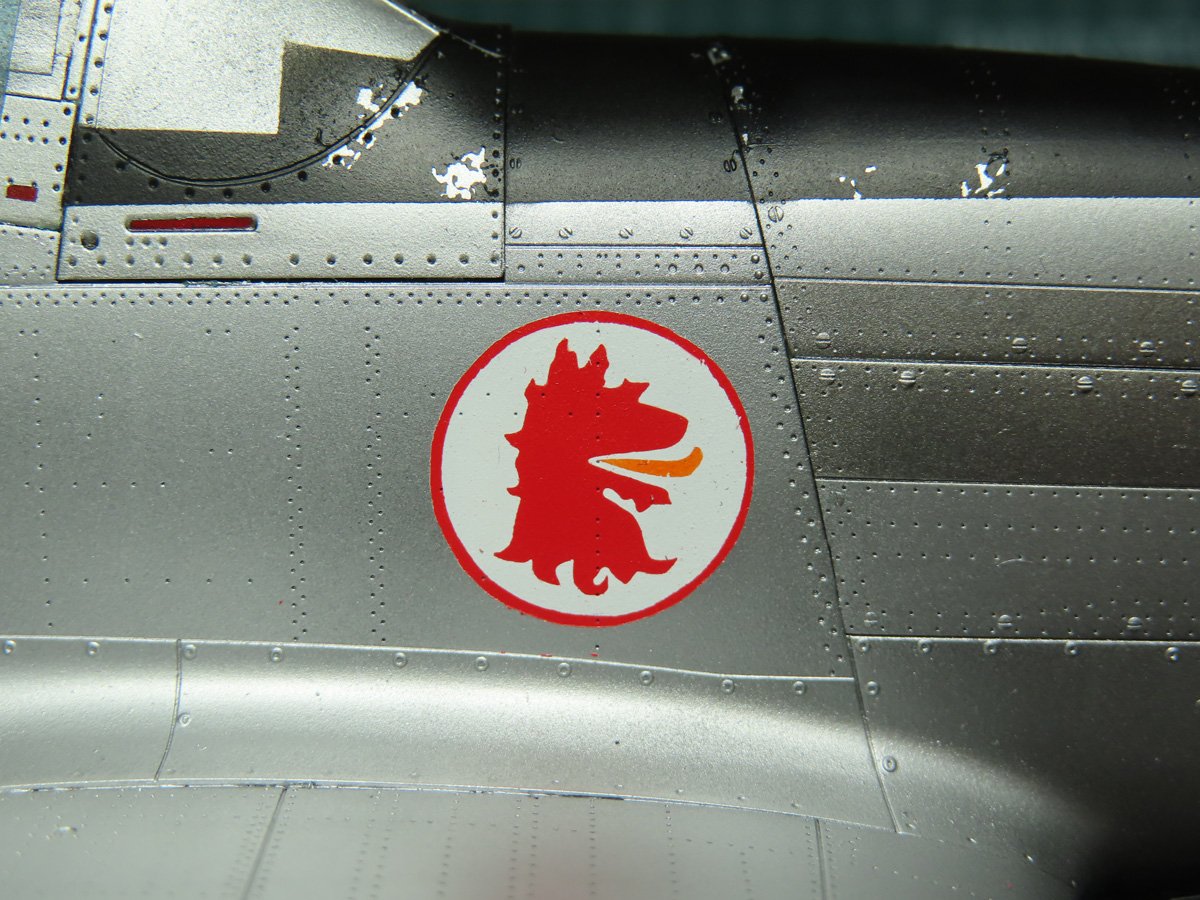
Lastly, for this post, I’m going to be painting on the 403 Squadron Insignia, a Griffon that sits just forward of the canopy. Based on my research, these griffons were either red, red-brown, or brown. And the tongues were black or orange. They were a simple stencil with a red or black round outline, and no eyes were painted on.
Quite odd in a way, but I imagine that these were painted on the aircraft in a hurry as they needed to be ready for active duty. So I’m going to paint 591 as best I can based on my research.
I’ve again started by painting a base layer of Mr Color C62 Flat White.
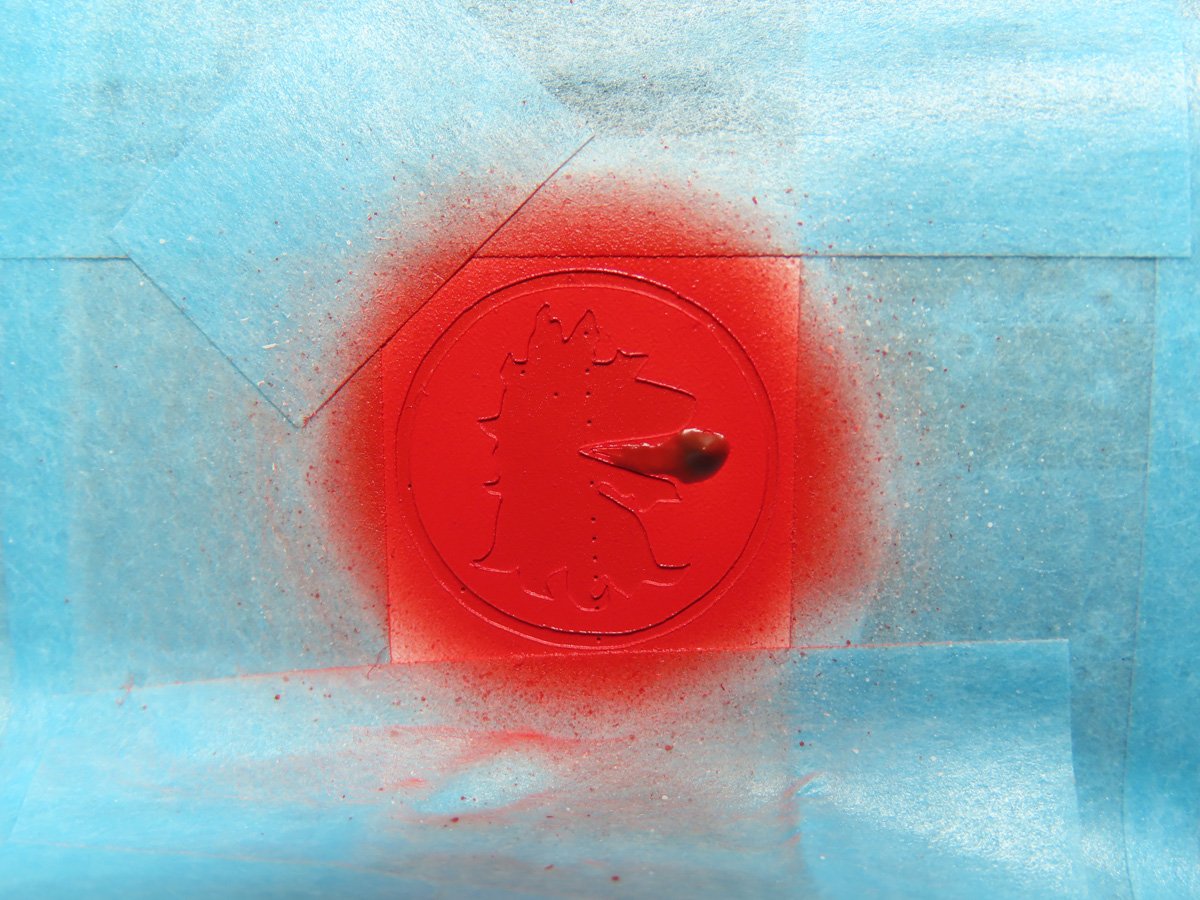
I wanted to use a different red from the Tamiya XF-7 I used previously on the roundels. And looking through my paint collection, I chose Mr Color GX 3 Hermann Red as it’s quite a bit darker.
It was difficult to see in my reference picture, but I do think that 591 had a thin red outline, so that was painted on as well. The tongue was temporarily masked off with Mr. Masking Sol Neo.
The tongue was painted with Mr Color C59 Orange, and oddly, on the other side of the model, hardly any paint stayed on. I’m going to try hand-painting that later.
Again, I’m very impressed with how well the cutter cut out all of these curves around the griffon, and it looks so cool seeing this on the front of the aircraft. I also love seeing all of these recessed rivets through the paint; it’s so much nicer than trying to get the decals to conform to the surface properly.
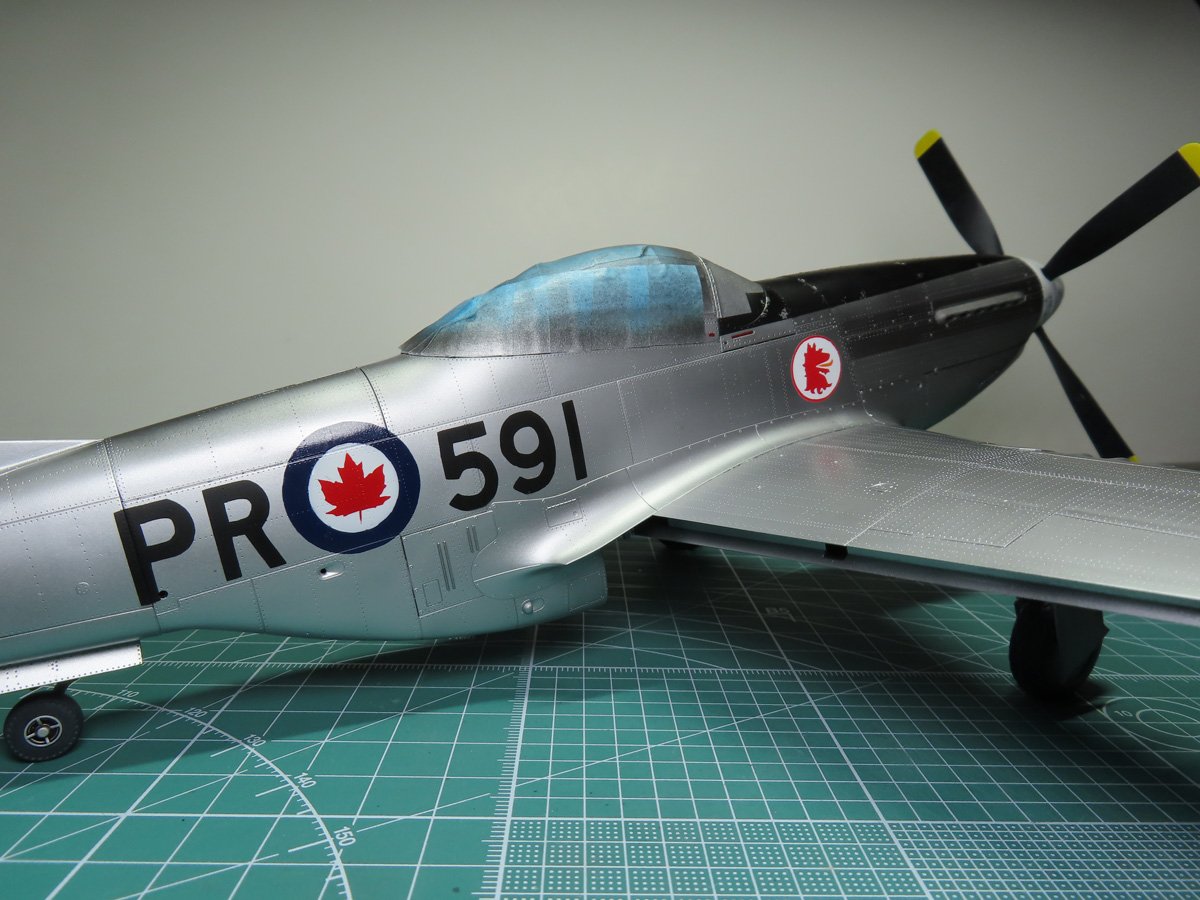
It’s odd that for a few weeks now I’ve just been looking at a silver F-51D with white highlights, and now I get to appreciate a Canadian Mustang, and to top it off, it’s from Calgary.
I’ve still got to paint the details on the tail, but after that is completed, I’ll be able to go through the long process of applying all the decal stencils. And as much as I’ve enjoyed and stressed with these stencils, I still do really like adding decals. To be honest, it’s one of my favourite parts of scale modeling.
In an unusual way, I’m sort of glad that my compressor broke and I had to get a new one. This new compressor has allowed me more power and options for my painting, and has helped greatly when I needed to paint the small details on the stencils. I had more accuracy and control painting with my airbrush.
And to make things even more strange, it broke down around Halloween… good thing I’m not superstitious, or I’d think that this Mustang had the ability to ruin my compressor. Or perhaps, being a Tamiya kit, it was just trying to help me improve with my painting.
To be continued…
About the Author:
Jared Demes is a modeler from southern Alberta. He has been building models since he was 4 years old when his Dad first introduced him to the hobby. He has written for several magazines including, Fine Scale Modeler, Scale Aircraft Modeling, Phoenix Scale Models, and others. He has an interest in all modeling subjects, with a focus on WWII Japanese aircraft and Science Fiction.
Jared has won several IPMS awards for his modeling, and currently operates his YouTube channel rebelsatcloudnine, where he showcases model builds and product demonstrations.
First Post: Part 1
Previous Post: Part 15
Next Post: Part 17