
Painting with Spray Cans – Part 1
by Thomas Ricci
I would like to start with that there are two school of thought in spray painting a plastic model, the airbrushing and the spray can.
If you may be inexperienced with an airbrush, and for whatever the reason and brush painting is starting to get old and it does not offer you the finish that you’re looking for and it surely its not the finish you see at the modelling shows or on the finished models you see at the hobby stores, or even what you see online, then you are starting to consider airbrush painting.
Before we go any further, you must ensure you have the right protective wear and new apparatuses before using any spray paints such as: protective clothing, masks, filters, safety glasses, spray paints, poster-boards, or a spray booth, tools, old newspapers or magazines, cleaning solutions, stencils, masking tape and masking paper, spray gun, air compressor, lines, hoses, paint thinners, primer, acrylic topcoat, clear-coat lacquer, and a buffers. You’ll also to set up a ventilation system, what else?
What about using the spray paint in a can? well then, this product may be just what you’re looking for. Spray cans are ideal for single color, monotone models, the supply list to use cans is not as great, other than: some masking tape, safety glasses, cleaning solutions you already have from cleaning supplies and other paint related tools, now you are just about ready to go. Sure, some people go as far as a spray booth and ventilation, but most spray can users are okay with the garage or some other ventilated room.
See the staff at our hobby shop or at the staff will help you with the accessories you might need.
With a bit of practice, you can master the spray can painting and paint multicolored models that can be also easily masked.
The anatomy of the aerosol can:
It’s a metal can. In the metal can there is a long plastic tube that runs from the bottom of the can up to a valve system at the top of the can. The valve in this diagram has a very simple design. It has a small, press-able head piece, with a narrow channel running through it. The channel runs from an inlet near the bottom of the head piece to a small nozzle at the top. A spring pushes the head piece up, so the channel inlet is blocked by a tight seal.
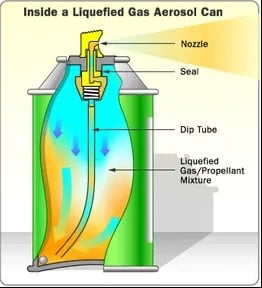
How it works:
When you push the head piece down (nozzle), the inlet slides below the seal, opening a passage from the inside of the can to the outside. The high-pressure propellant gas drives the liquid product up the plastic tube and out through the nozzle. The narrow nozzle serves to atomize the flowing liquid (or break it up into tiny drops, which form a fine spray).
Finally, inside the spray can there is a small ball bearing that works as an agitator. When you shake the can, the ball bearing is rattled, the action mixes the thinned paint with the gas propellant. Essentially, this is all there is to a simple compressed-gas aerosol can.
This spray action can take a while if the can has been inactive for a while, in terms of weeks and months. Better quality spray cans usually are quicker in the mixing when shaken, not stirred!
Why a Curved Bottom?
In most aerosol cans, the bottom curves inward. This serves two functions:
1) The shape strengthens the structure of the can. If the can had a flat bottom, the force of the pressurized gas might push the metal outward. A curved bottom has greater structural integrity, just like an architectural arch or dome. With this shape, most of the force applied at the top of the curved metal is distributed to the sturdy edges of the can.
2) Also, the shape makes it easier to use up all the product. Draining a flat-bottom can would be like sucking up the last little bit of a glass of water through a straw: You would have to tilt the can to one side so the product would collect under the plastic tube. With a curved bottom design, the last bit of product collects in the small area around the edges of the can. This makes it easier to empty almost all the liquid.
Troubleshooting
There are a few reasons why the paint may not spray as expected.
One reason is because the siphon tube may have curved/curled inside the can. Another reason, and most likely to happen very often, is that the nozzle is clogged, you might have to replace it or rotate it so you can break the dry paint that’s clogging the spray passage. If that doesn’t work, then you might want to replace the nozzle.
Last one I can think of is that the can is empty, and if you a running out of paint, see your favourite hobby shop like to replenish your stock.
The anatomy of the spraying can
If you must spray indoors, find a location other than your kitchen, or other living spaces in your house, a more likely a place to spray is an isolated workshop, or in the detached garage, remember it must be a well-ventilated room or space, and obviously within your means.
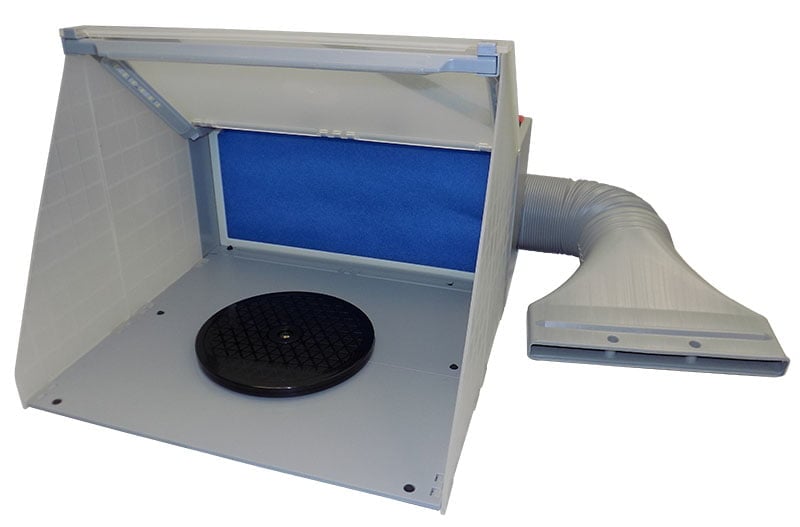
Now that you have a safe place to do this, you can get a large cardboard box to catch the over-spray. It doesn’t have to be with all the trimmings like the picture, but you get the idea. If you must spray indoor, a homemade cardboard spray booth won’t take the fumes out of the air, absolutely not, you still need to ventilate the area; you don’t want this to be your end, keep in mind that it’s a hobby!
With care, place and use this spray booth in other areas other than your kitchen, or other living spaces in your house, a more likely a place is your isolated workshop, or in the detached garage, remember it must also be a well-ventilated room or space, to catch the over-spray and save your furniture and your lungs.
Care, safety, and careful set up goes a long way.
Thomas Ricci has been building model airplanes since the age of 12. When I reached the age of 14, he formed a club with the Royal Canadian Air Cadets Squadron in Toronto, and helped build plastic model airplanes for general displays.
Over the years, Thomas has continued to build aircraft and joined local modelling clubs within the Greater Toronto Area (GTA).
His skills are now focused on building Italian aircraft, and aircraft flown by Italian pilots and or engineered by Italian engineers. The main goal is to build the aircraft as historical accurate as possible with a story line.
A list of past and ongoing modelling participation by Thomas include:
-Peel Scale Modelers, Aerobuffs, IPMS Italy, IPMS Toronto
– Founder and President of the Club Frecce Tricolori of North America No117
– Participated in the MB339 aircraft model building and display representing the Frecce Tricolori PAN in Oderzo and Rivolto (UD) Italy (2012)
– Founder and Supporter of the Checkertails di Lesina, a monument dedicated to the U.S.A.A.F. 325th Fighter Group, Checkertails; Lesina (FG) Italy (2011 – present)