
Revell HMCS Snowberry Flower Class Corvette
This is the fifteenth part of the Revell HMCS Snowberry Flower Class Corvette 1/144 Scale RVG 05132
Nearly a decade ago, I logged onto Facebook, and I was greeted with an amazing image of the new Tamiya 1/350 IJN Yamato sailing on the water. At first glance, the ship itself was spectacular to look at, but the waves were particularly impressive and realistic.

I later learned that this model was built by professional painter Chris Flodberg, who specialized in ship models. And that he was from Calgary, so not that far away from me. When I attended a local model show in 2015, Chris brought some of his models, including that jaw-dropping Yamato, and the pictures failed to do it justice; it was simply perfection.
The picture I took is a poor representation. I sadly wasn’t there when Chris took off the glass cover (most likely looking at models to buy). But I got to briefly meet him, and he was one of the kindest modelers you’ve ever met, and more than gracious to explain how he achieved this water effect.
A short time later, Chris had his water effects published in several magazines, including Fine Scale Modeler. And when this Snowberry showed up, I immediately thought of his article and that it was finally time for me to try it out for myself.
I’ll be using Chris’ article as a guide, as well as incorporating many of my own ideas into creating this water effect.

To start, I’m using a 2-inch-thick piece of insulation foam. I needed this foam to be a bit thicker, as I will have to compensate for the full hull of the Snowberry.
Insulation foam will work best for this project as it’s dense enough for carving into, it’s also light and quite easy to work with.

I placed the ship onto the foam in the position I wanted the ship to be displayed. Once I had made up my mind, I took a Gundam Marker and slowly traced the ship’s outline onto the foam
I intentionally kept the outline smaller than it needed to be, as it would be a lot easier to remove extra foam rather than trying to add to it.
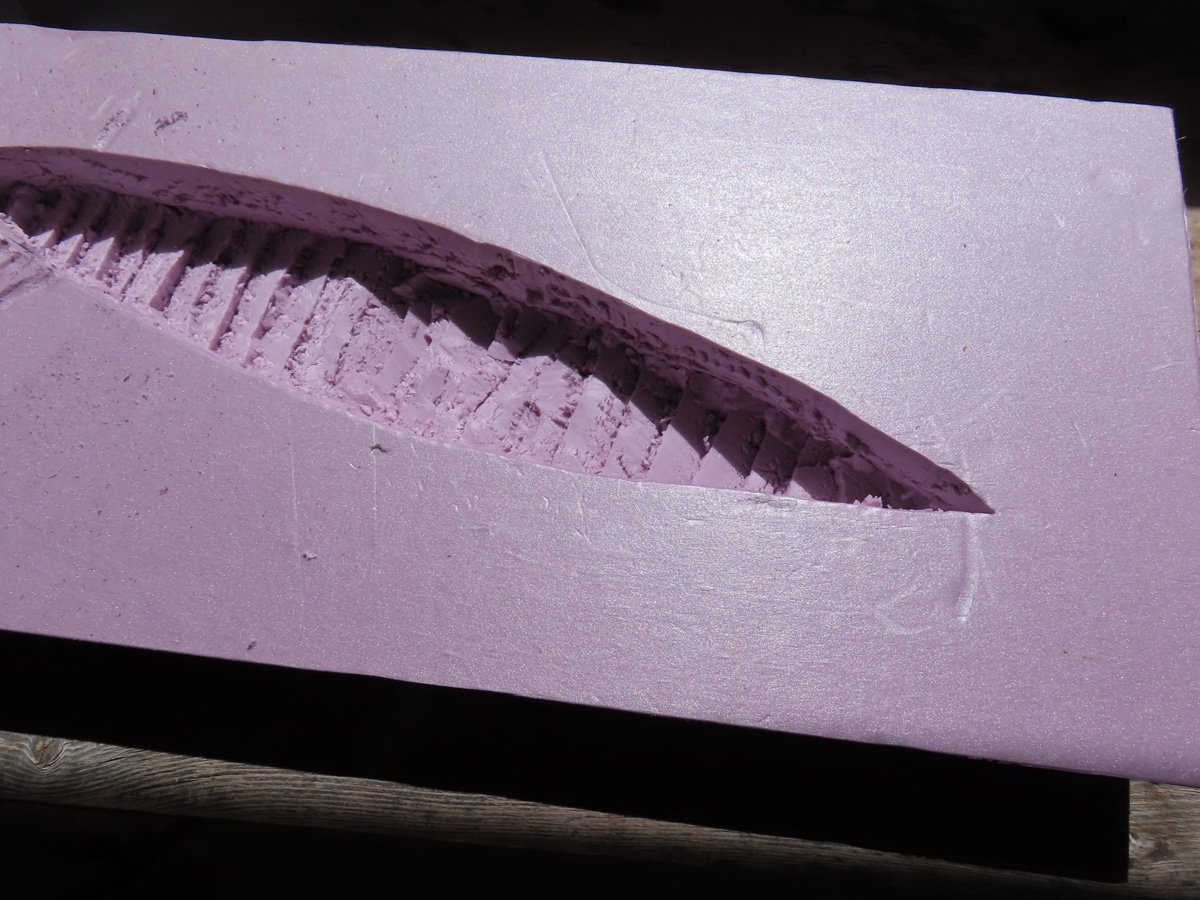
It took some time, but I was able to carve out the extra foam for the Snowberry to rest in. I mainly used an Excel Hobby #11 blade to cut away at the foam, and every once in and while I’d place the Snowberry inside of the opening to check the fit.
It didn’t take too much work to trim out the sides of the foam to have a good fit for the ship. It should be a close fit; not necessarily an exact fit, so a little wiggle room is acceptable.
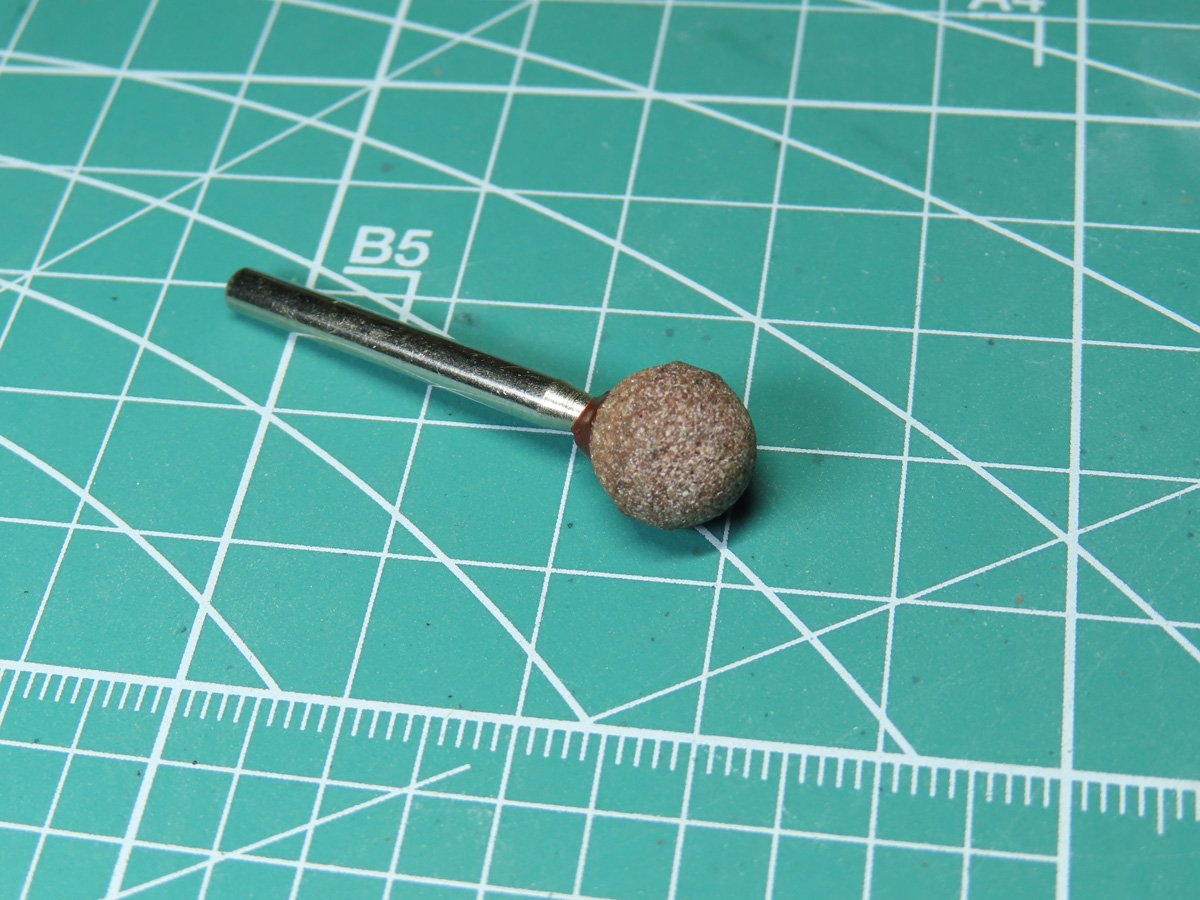
I didn’t have the exact same wire brush tool that Chris used in his magazine demonstration. So I pulled out a few bits that were similar that I could use in my Dremel.
Though all of the bits did work, they weren’t giving me the results that I wanted. I went back and looked through the bits and I found this sanding ball that I had somehow missed. I decided to test it out, and it quickly proved to be the best tool for creating the waves.

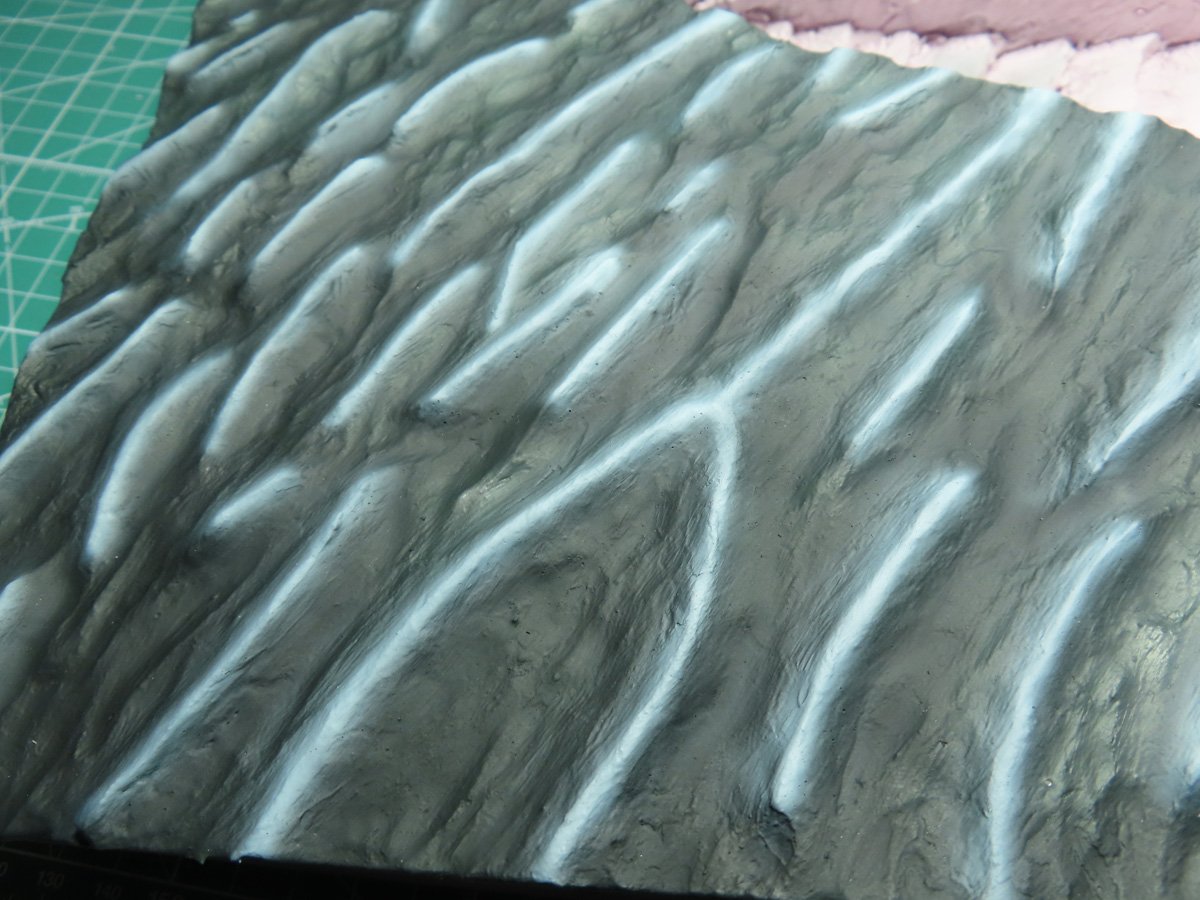
I carved out the foam, made trenches, and focused on creating ovals and Y and U shapes. I’d go back on some of these trenches and deepen them to help create the impression that the waves were rolling.
At this stage, I’m just concerned about the direction of the waves as the ship passes through. I’ll focus on the wake produced by the ship later on.

The flat surfaces of the foam were now going to be carved into the peaks of the waves. I would start on one side of the peaks, slowly sanding away the foam until I had a narrow bit of the line left.

Then I’d flip the foam around and repeat this process on the opposite side. This would eventually form a nice-looking peak in the waves. And the rounded sander helped to create a nice flowing pattern that added to the effect of the water.

Here is the completed wave effect, all carved out. It was a very fun process to sit and carve all of this out and gradually see these waves take shape. I’m very pleased with how these look, and I’m eager to see how much better they will appear once they have been painted.

Now I needed to cover the foam for painting. A lot of paints can eat away and dissolve the foam, so it’s important at this stage to protect all of that work we’ve just put in. Chris uses Liquitex Glazing Medium, but I looked all over and I couldn’t find any.
So I decided to use Modpodge, but I either couldn’t find it, or I could buy a giant $118 bucket of it. I decided to use regular PVA Glue Elmers white glue thinned with some water to help it flow better.
I applied a few coats of the Elmers white glue, and it was doing a nice job creating a thin layer over the foam. It was taking a while to build up the glue, and I mentioned to my sister that I wish I had something else that would speed up the work.
When I told her about the Glazing Medium I couldn’t find, she informed me that she had a bottle and that there might be enough left for the project.

I applied 3 thin coats of the Glazing Medium to the foam. Just a little bit of this stuff goes a long way, and before I knew it, I had a nice smooth surface that was ready for paint. Thanks Sarah.

To paint my ocean, I started with a base layer of Tamiya XF-17 Sea Blue. This is a very dark color, but very nice as it has a blue-green color to it.
Next, I painted the peaks of the waves with a 50-50 mixture of Tamiya XF-18 Medium Blue and XF-2 Flat White. This was painted on with a lower pressure so that it would create softer lines.

The final color I used was Tamiya XF-8 Flat Blue. This was again sprayed on with a lower pressure and painted over sections of the Sea Blue, with some over spray landing on the brightened peaks.
This both blended the colors together and helped to lighten up sections of the dark Sea Blue. I sprayed this on rather quickly so that the Flat blue would appear more random and uneven.
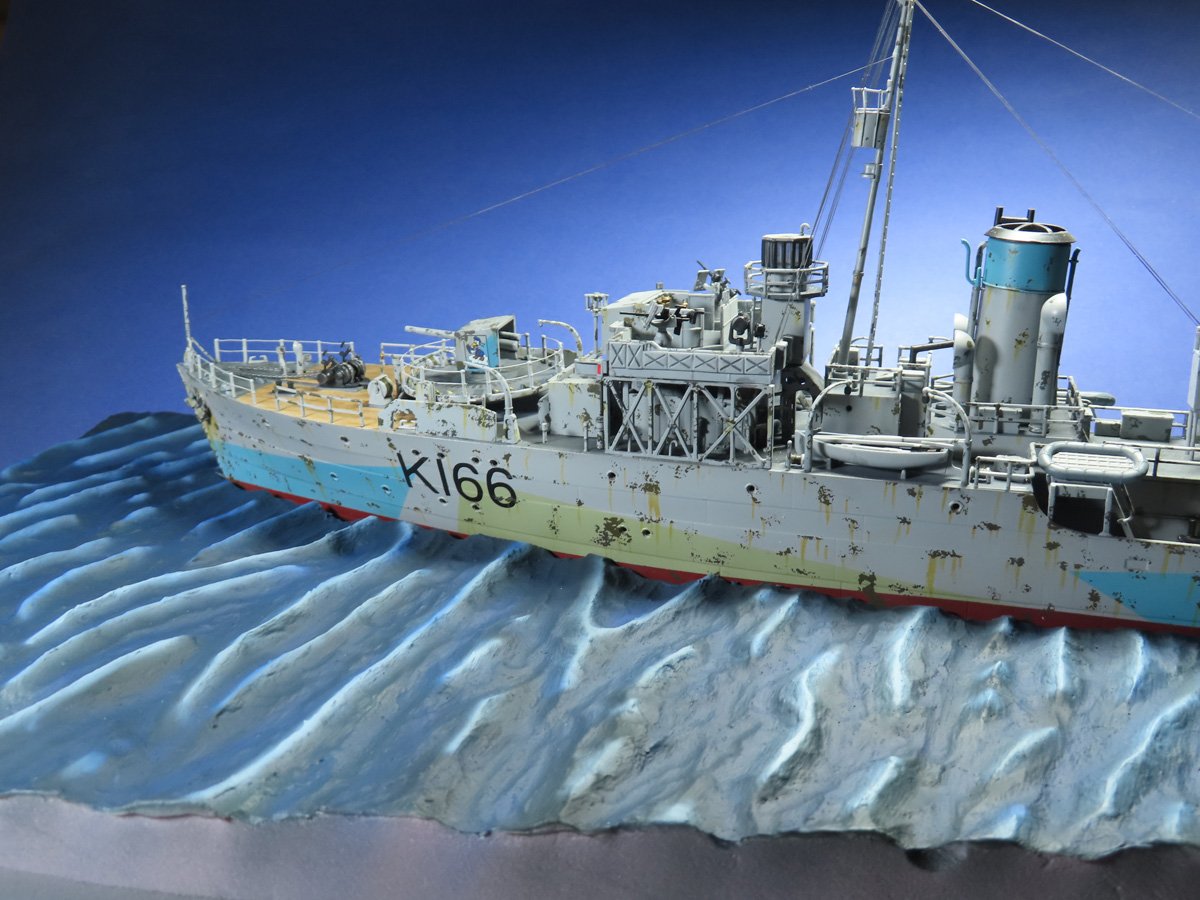
This is where we’ll end for this week. In the next post, we’ll be testing out some new water products, and with that, I think this project will be completed. I’m very happy with how the water looks so far, and with the Snowberry placed inside, it’s looking right at home out on the ocean.
I am saddened to report that Chis is no longer modeling and that he hasn’t been for a while now. The good news is that he is still active in painting, but most of his models were all sold off a few years ago. Thankfully, there are images around online if you search for them.
I remember when he posted that he was selling that gorgeous Yamato, and how desperately I wanted to buy it. But at the time, funds were tight, and there was no way I could justify a purchase like that, no matter how much I wanted it. However, this could also be a good reason to build more ships in the future, so that one day, perhaps, I could build something like that for myself. This Snowberry has me already feeling ambitious, so we’ll just have to wait and see what the future holds.
For now, let’s focus back on the HMCS Snowberry, in what will be the conclusion to this very fun build.
To be concluded…
Jared Demes is a modeler from southern Alberta. He has been building models since he was 4 years old when his Dad first introduced him to the hobby. He has written for several magazines including, Fine Scale Modeler, Scale Aircraft Modeling, Phoenix Scale Models, and others. He has an interest in all modeling subjects, with a focus on WWII Japanese aircraft and Science Fiction.
Jared has won several IPMS awards for his modeling, and currently operates his YouTube channel rebelsatcloudnine, where he showcases model builds and product demonstrations.
First Post: Part 1
Previous Post: Part 14
Next Post: Part 16