
Tamiya 1/48 F4U-1D Corsair with Moto-Tug
This is the fourth part of the Tamiya 1/48 F4U-1D Corsair with Moto-Tug 61085 build and review.
I’m getting closer to finally adding some primer and paint to this model. There’s not too much more to do at the moment, but I’m going to be adding some details to the engine, wheels, and landing gear to boost up the detail.
I’ve had this idea in my mind for several years now, and that’s to add tread onto a smooth wheel. But first, I’m going to have to thin down the wheels included with the kit.
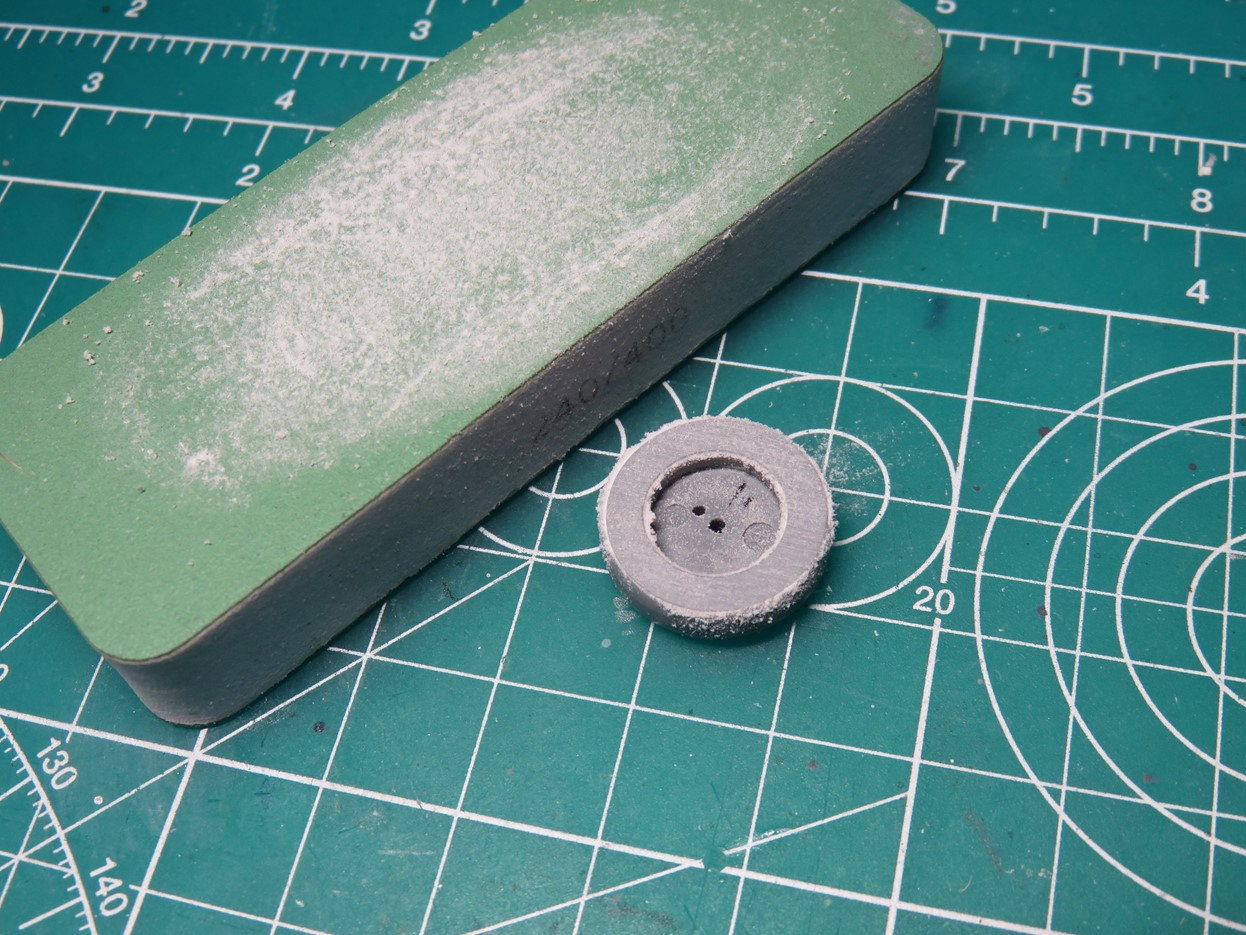
I began by sanding down the outer sides of the tires using a Vallejo Sanding Pads. Once I was satisfied with the width of the tires I sanded down the curved profile of the tire. The tires on the Corsair and Hellcat are pretty thin to allow them to fit backward into the wheel bays, and the newly thinned profile looks a lot better than the stock kit. You could stop at this stage, but I wanted to see if I could add a diamond tread to these wheels.

I had a few options to create the diamond tread pattern. I first experimented using Tamiya Masking Tape for Curves, a white Vinyl tape that is slightly raised. This worked well, but I hard a very had time cutting the vinyl as by its nature it flexes. I also had the worry that the tape would lose adhesion over the years and my tires would lose their tread.
I then tried scribing the tread using the Tamiya Masking Tape for Curves as a guide, and a Tamiya Scribing Saw to carve out the plastic. This worked pretty well, but it was hard to keep the angle straight around the curved tire. It also just didn’t look accurate.
So I went with my final option. I cut out a few hundred squares of Evergreen 0.25mm styrene. This took a while to carefully cut out, but I decided that I would slowly glue these onto the wheel and it would create a more realistic tread.
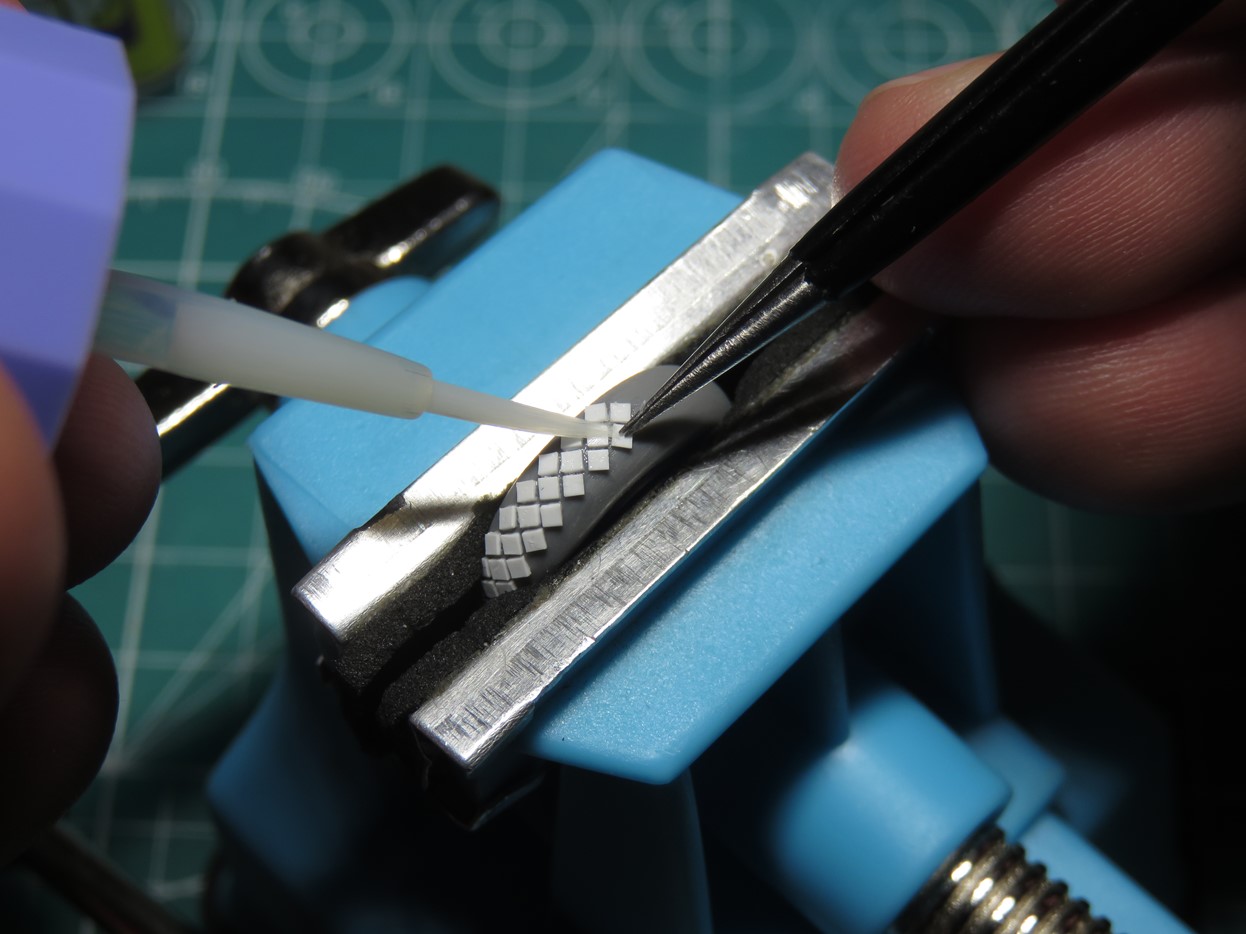
I mounted the tire into a mini vise from the Wave Corporation, and starting at the bottom of the tire I glued one diamond into the center section using Mr Cement SP as it is a more aggressive glue and this allowed me to work quicker. After the first diamond was glued down I’d then glue 2 more on the outer edges.
I started at the bottom of the tire so that once I went all around, if the tread didn’t match up I could easily sand this part flat to reflect a weighted tire.
This process did take a while to accomplish, but it was really satisfying to see the tread come together and take the shape that I had envisioned. Some of the treads look crooked, but this is just an illusion from the curve of the tire.
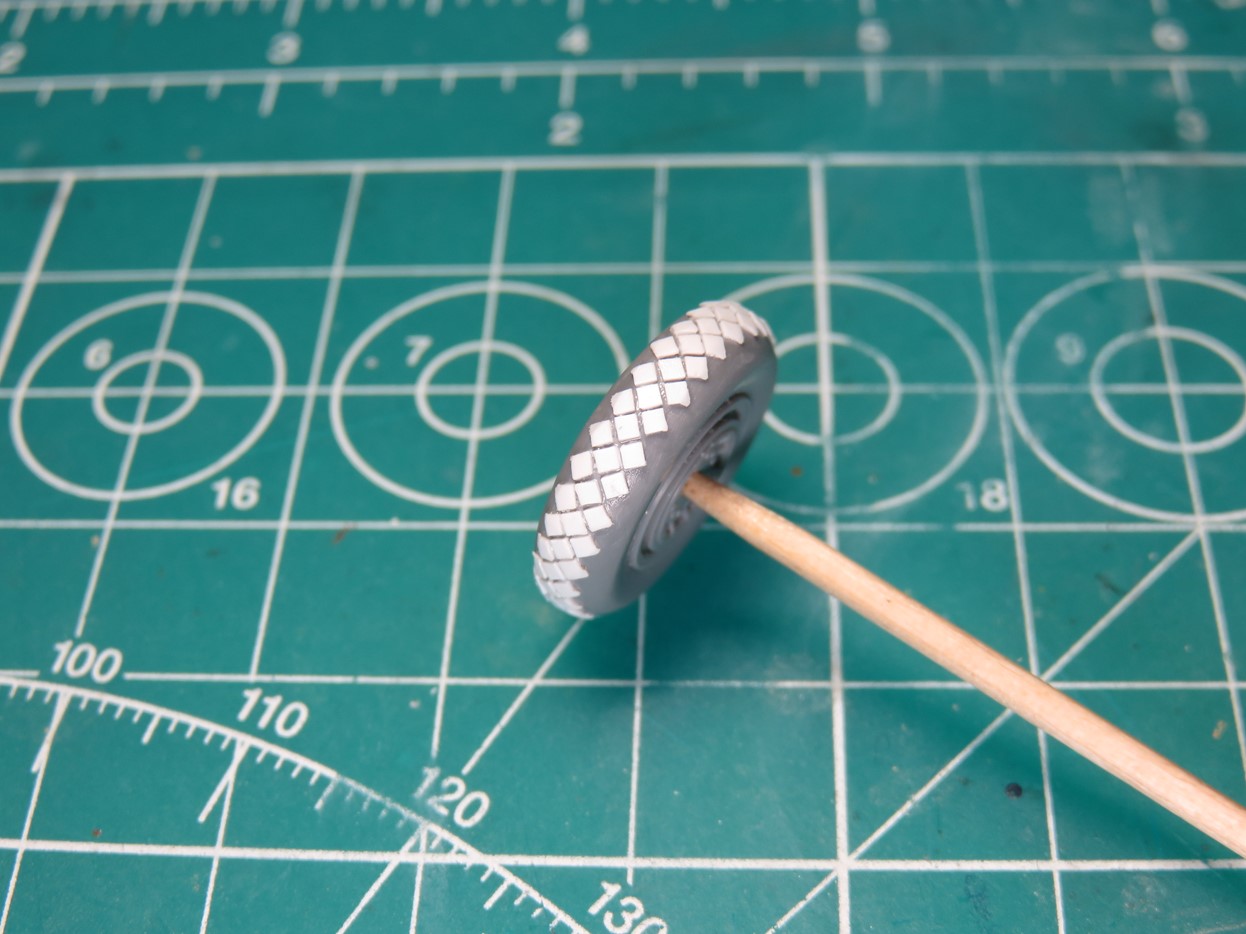
Lastly, I sanded down the edges of the styrene with a low grit sandpaper, just enough to round down the sharper edges.
I’m really pleased with the end result, and it will look a lot better later on when the wheels have been painted. I’m glad that I was finally able to try this after the many years this has been on my mind. I will admit, that I’m not sure that this was totally worth the effort versus just going out and buying a new set of resin wheels, but it was fun to try.

For the main landing gear, I drilled holes in the center section for the brake line. Then I used 0.20mm magnet wire and ran it from the bottom through to the top. I could have stopped here, but I wanted to try adding some springs that would go on the top section.
As before with the springs I made for the cowl flaps I bent some wire, this time 0.10mm, and glued it to the braces in the landing gear. This was tricky to do as the wire at this size is really fragile and bent easily so I had to use extra care when I glued the springs. I had to make 4 of these in total and it added some nice detail.
Now I moved on to building and painting the cowling and engine. The inside of the Corsair cowling is 2 colors, for the inner section, I painted Mr Color 351 Zinc Chromate Green. I then masked off this section and painted Mr. Color 62 Flat White. I wanted to see how this compared to Tamiya XF-2 Flat White. It’s not as bright as Tamiya, but I found it easier to paint on and build up instead of a lot of thin layers.
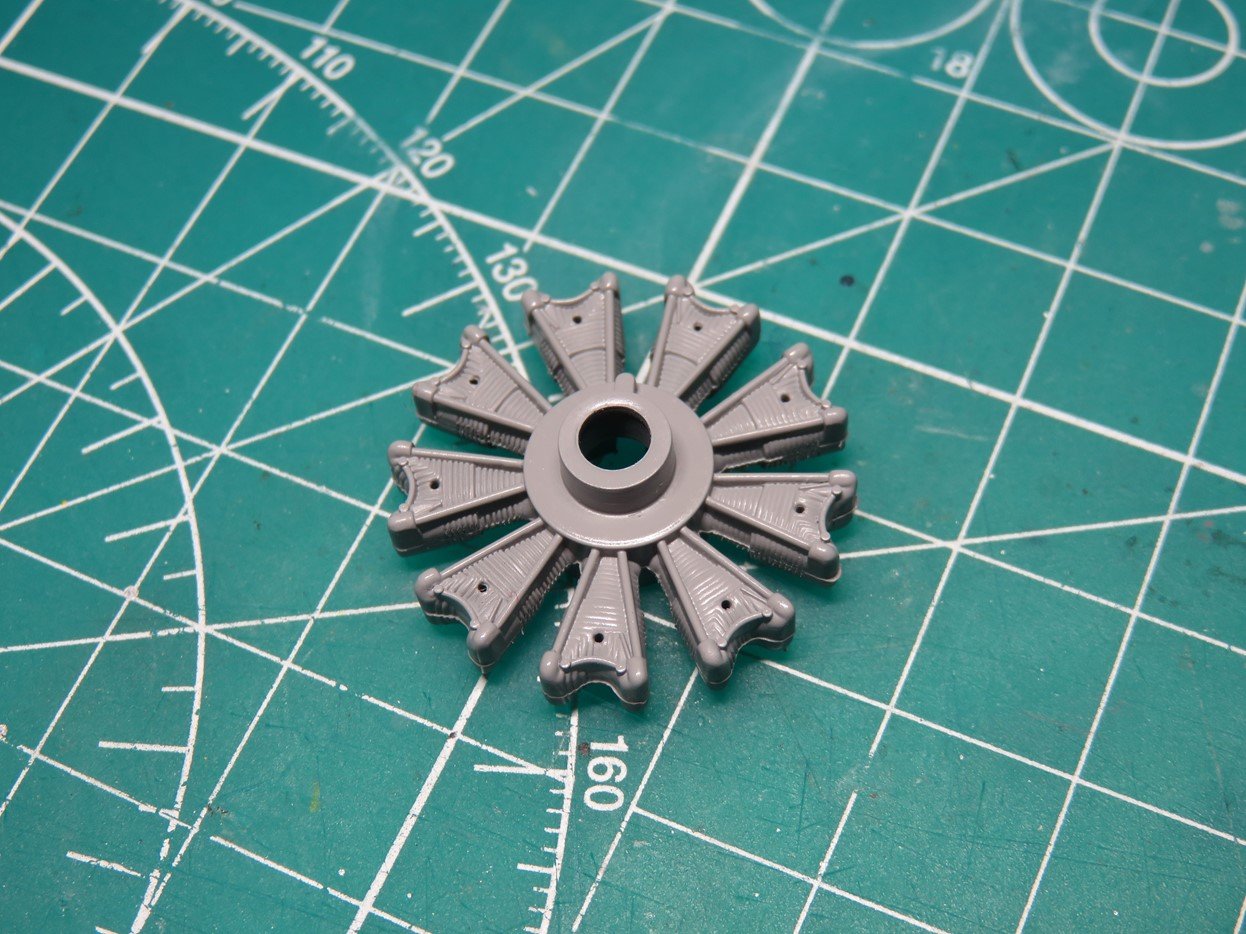
The Pratt & Whitney R-2800 Wasp engine is a fair representation of the real thing. It’s missing a lot of details on the crankcase, and the crankcase doesn’t stick out far enough, but with some modifications, we can add some details and really help this engine stand out.
I first drilled out the holes at the tops of the cylinder heads for the ignition wires. And then I painted the engine sections XF-19 Sky Grey and the crankcase with XF-24 Dark Grey. Afterwards, I applied a gloss coat to protect the paint while I added in the ignition wires.
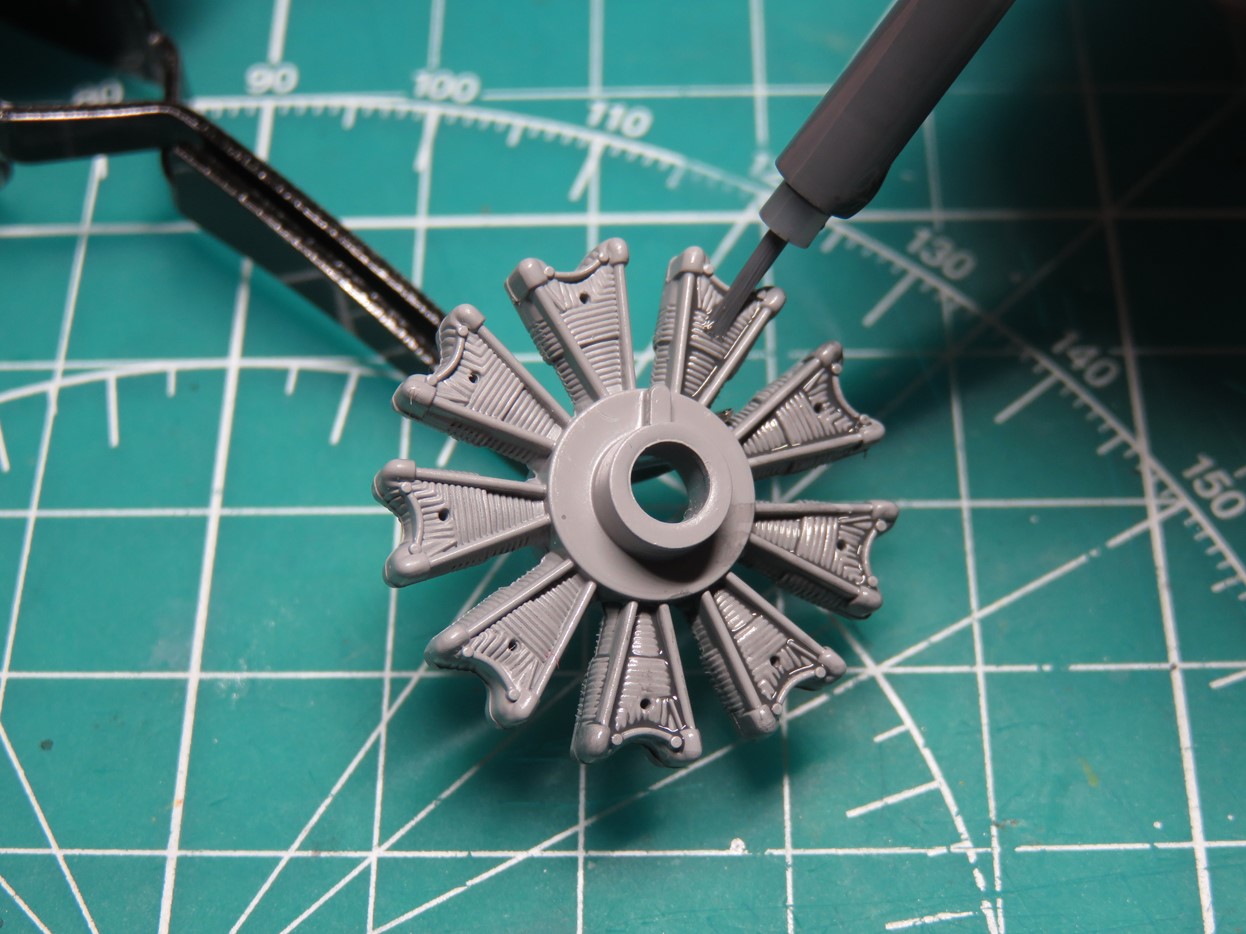
To further bring out the details, I painted Tamiya Panel Line Accent Color Dark Grey 87199 onto the cylinders and left them to dry overnight. Painting these will help the details of the engine stand out when everything is hidden behind the engine cowling.
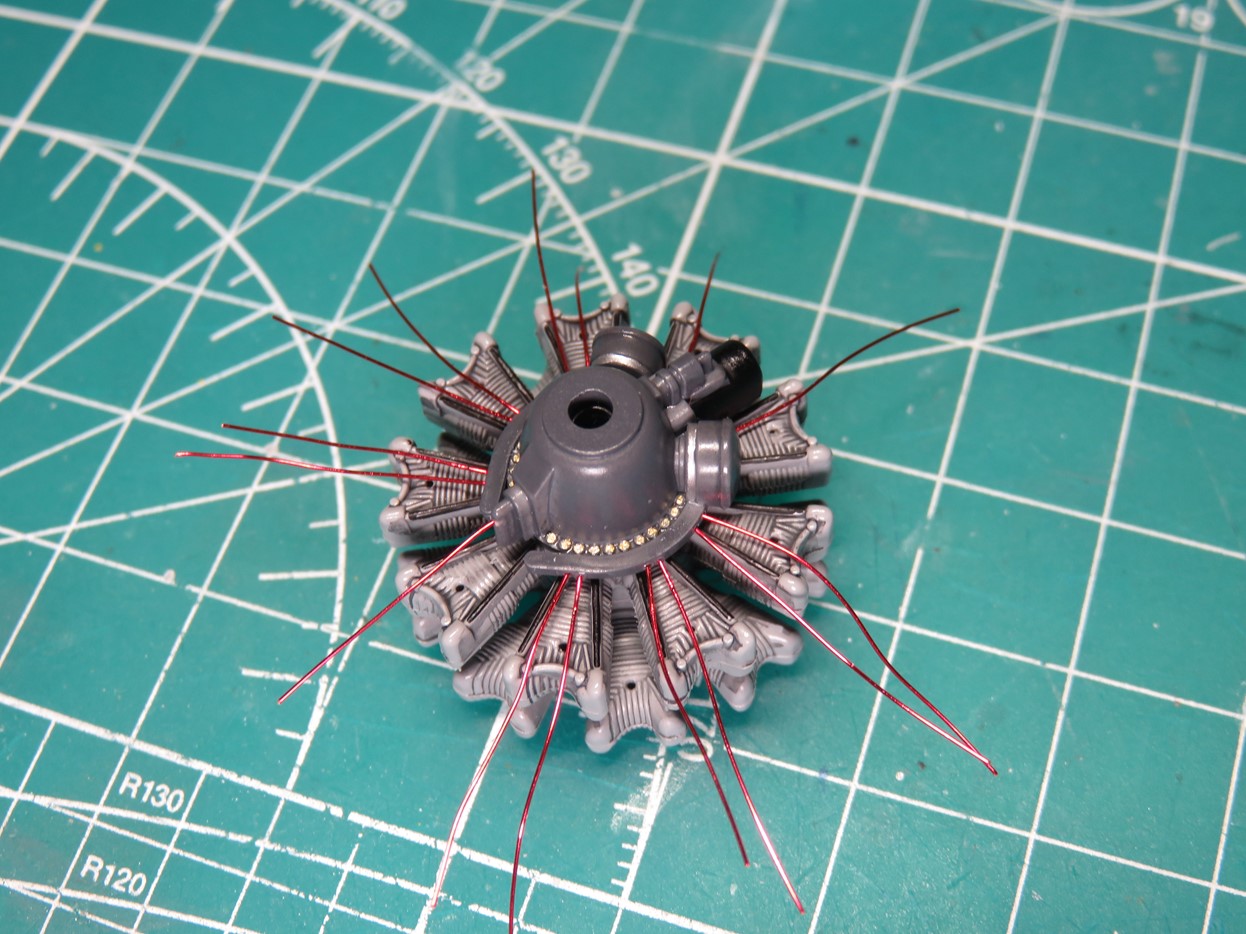
For some extra detail, I painted the bolts on the crankcase with Tamiya X-12 Gold Leaf, and then carefully drilled out holes around the ignition harness. I then glued in 0.20mm wires all around the crankcase.
At this point, it looked like a squished spider, but once the glue dried I carefully bent the wires through the holes I previously drilled out on the ignition heads.
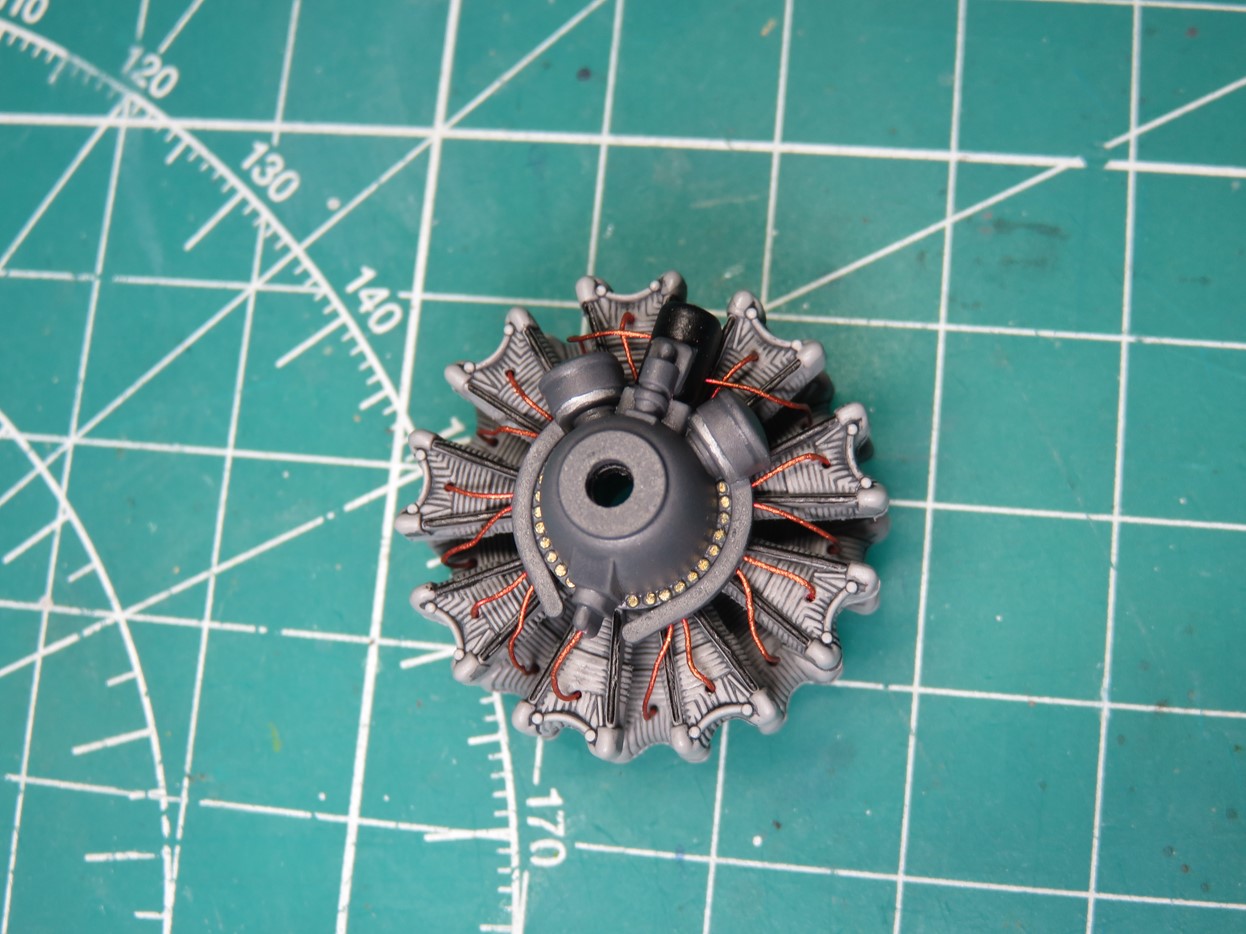
Once the ignition wires were in place I painted them with Tamiya XF-6 Copper. It took some time to carefully paint them all and avoid hitting the Sky Grey, but once the painting was completed I sprayed a flat coat over everything and my little engine was finally complete.
I’m really pleased with this section, and it looks really sharp when I test-fitted into the cowling. The only downside is that once the propeller goes onto the front it really ends up hiding the engine.
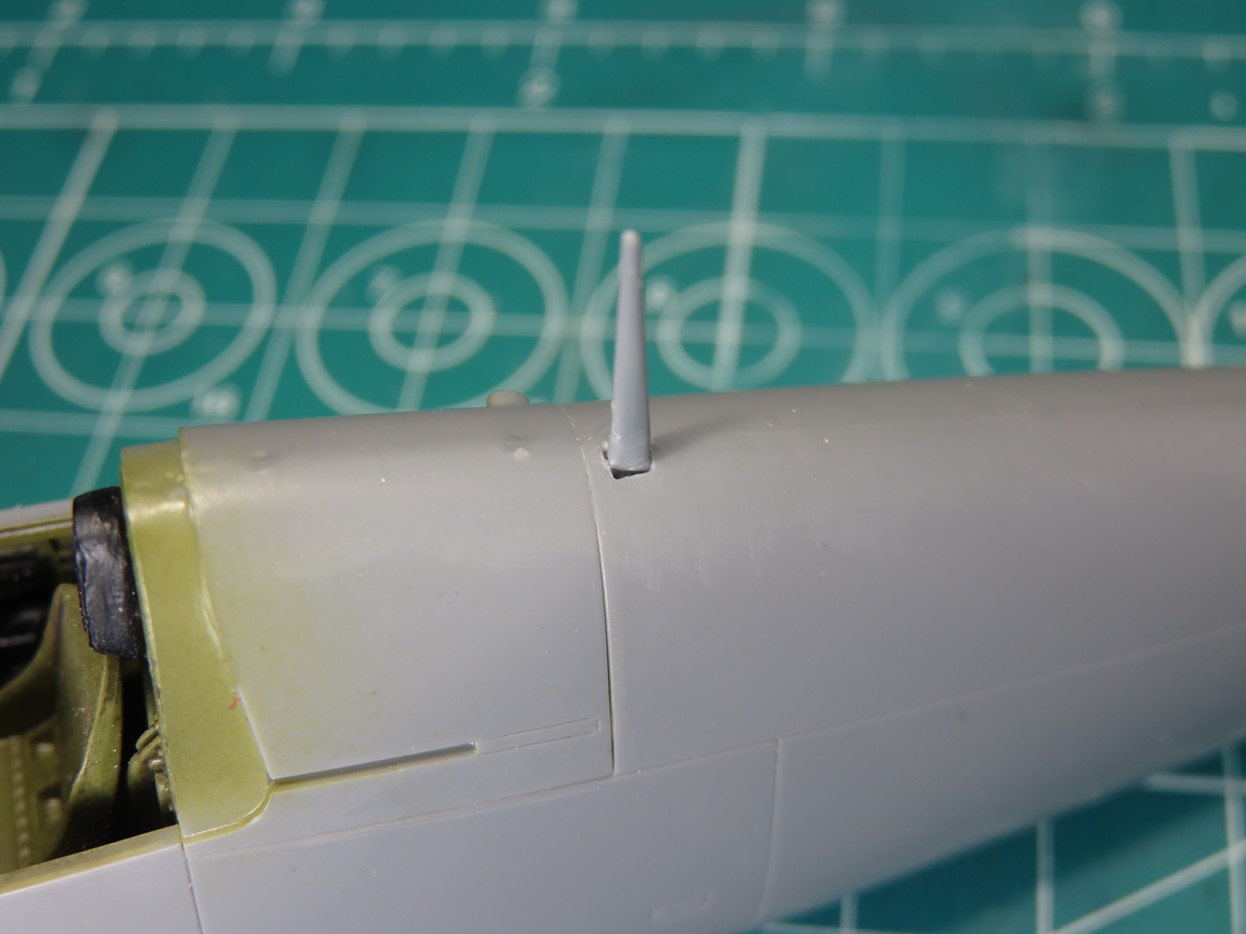
The antenna that sits just behind the cockpit needs a bit of work. It’s meant to sit straight up, and angled forward, however the part has a round disk at the base. So I sanded this off and I was left with quite a large gap all around the base.
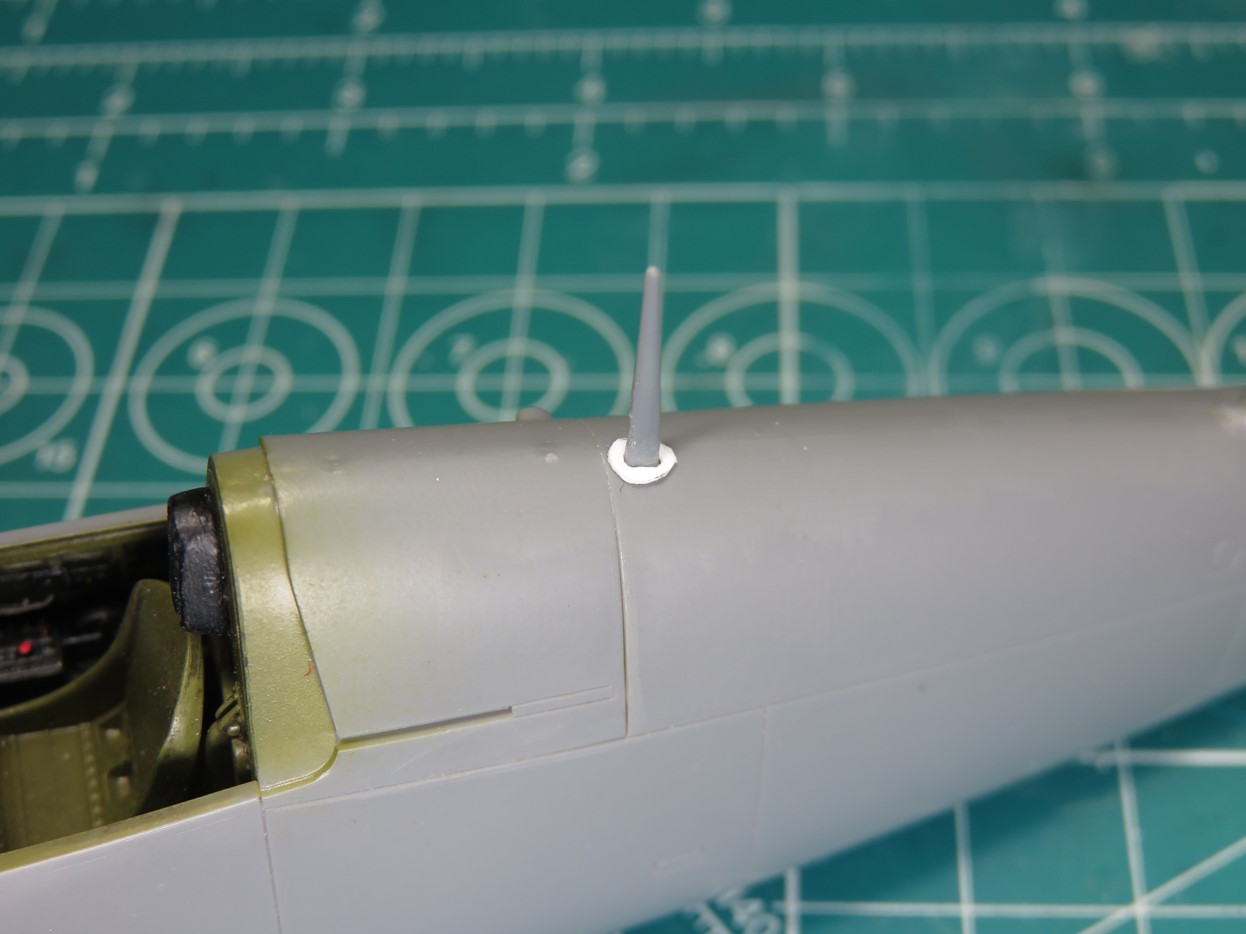
I could have simply filled the gap in with Mr Dissolved Putty P119, but I really liked the detail of that disk, so I decided to build one out of styrene. It was tricky to sand down a nice oval shape, but with some time and patience I got the shape I wanted and it looks really cool.
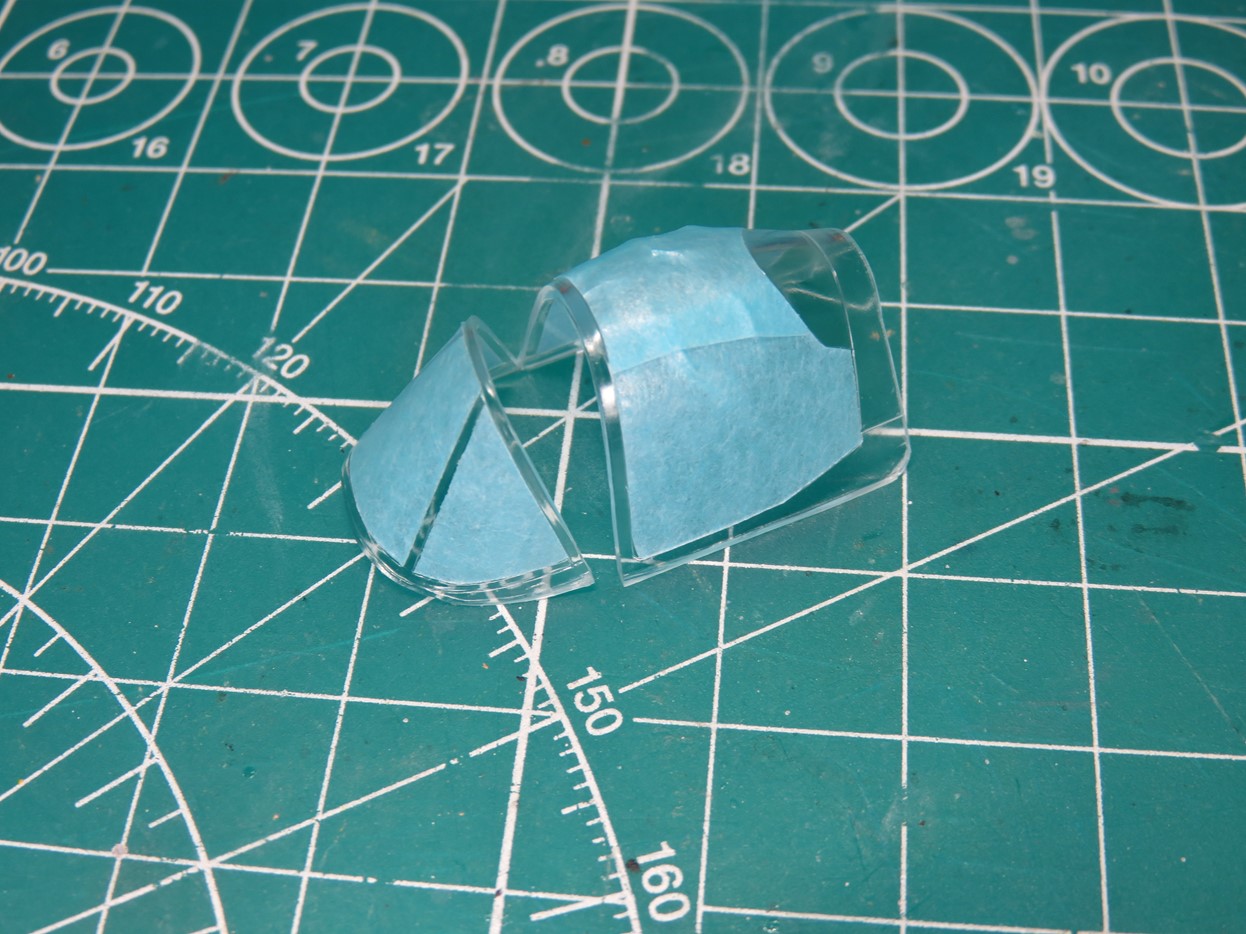
Lastly, for this week, I masked off the canopy sections with modeling tape. I usually cut out my own masks, but this was a time when I wished that I had some precut masks as the frames for this kit were fairly thin and were at times difficult to see and cut out.
Usually, I will temporarily glue the canopy onto the model so that everything can be painted in uniform. But I think this time it will be easier to leave these parts off until last.
Now all I need to do is begin the long haul of masking off the models painted sections, and in the next post, we’ll start laying down a coat of primer.
To be continued…
Jared Demes is a modeler from southern Alberta. He has been building models since he was 4 years old when his Dad first introduced him to the hobby. He has written for several magazines including, Fine Scale Modeler, Scale Aircraft Modeling, Phoenix Scale Models, and others. He has an interest in all modeling subjects, with a focus on WWII Japanese aircraft and Science Fiction.
Jared has won several IPMS awards for his modeling, and currently operates his YouTube channel rebelsatcloudnine, where he showcases model builds and product demonstrations.