
Painting with Spray Cans – Part 2
by Thomas Ricci
Hello, and welcome to Part 2 of “How to paint with spray cans”. Lets get some items out of the way before we really start spraying, after all asking for forgiveness here doesn’t apply to oneself.
Beware of:
Dust: it’s you are the enemy.
Inspect the model for dust particles. Dust is a fact of life that will always affect painting models. To avoid dust, make sure the model and the area you are spraying in are as clean as possible. On the proactive side, look for a spot that may not be as dusty and is a well-ventilated area. When that moment happens that you get dust on the freshly painted model, carefully pick it out with sharp- pointed tweezers or by carefully touching with masking tape to the area while the paint is still wet. Subsequent coats should only be applied after you have had a chance for the paint to dry …… a bit.
Distraction: who? what?
When its time to spray, ensure that you are going to be focused, and you can concentrate fully on the task at hand; try not to get distracted, also remember some of the safety aspects from Part 1 of this series. You want to get the best finish that you can after all the work you are doing.
Masking and other taping: something to stick to.
Ensure that the masking tape is sticking, and the edges are down and firm. Use a burnisher to make sure the edges are sticking, especially if you’re painting two or more tones, you do not want the paint to seep in behind the tape, it could spoil the day!
Paint:
Make sure you have enough paint in the can; you don’t want to tell this tale, so close!
The painting tools:
Find a location other than your kitchen, or other living spaces in your house, a more likely place to spray is an isolated workshop, or in the detached garage, remember it must be a well-ventilated room or space, and obviously within your means.
For years, modelers have, more often than anything else, used a wire coat hanger to hold the models while spraying. I can’t think of anything better for holding car body, an airplane fuselage, a ship hull. You can bend and shape the hanger any which way as long as it holds the model as you spray.
The idea is to hold the model while you spray, freeing up your hands to manipulate the model angles and orientation as you spray, and you can leave it there while the paint dries.
For small parts, you can get a wide strip of masking tape or painter masking tape and tack the two ends to make a loop, say 3 to 4 inches with the sticky side out, one side stick it to the to cardboard, the other side press the model parts to the tape, again it frees up your hands.
Another tool is the alligator clip, it can also come in handy. Tape the opposite end of the jaws to a stirring stick, or insert a wooden stick in the closed end, and now you have a third hand. For more stability, get a styrofoam block, and insert the wooden end of the alligator clip. You can get a wooden block and pre-drill a series of holes to match the wooden stick, then use it to place the homemade extended alligator clips.
How to Prevent Spray Paint Cans from Clogging
I have always recommended to shake the can for 30-60 seconds after you hear the mixing ball start to rattle. If the ball inside is slow in rattling, keep shaking the can, the ball must sound free inside the can. After you hear the ball free rattling, keep shaking for at least another minute, this will ensure the paint and propellants are well mixed. Here is the catch: If the paint is not mixed, the settled pigment can cause the can to clog. Why? The spray can contain two ingredients: thinned paint, and a compressed gas propellant. Inside the spray can there is a small ball bearing that works as an agitator. When you shake the can, the ball bearing is rattled, the action mixes the thinned paint with the gas propellant. This action can take a while if the can has been inactive for a while, in terms of weeks and months. Better quality spray cans usually are quicker in the mixing when shaken.
It is also a good idea to shake the can between sprays. This helps prevent the nozzle from clogging and lets the paint spray on evenly.
You can also take steps to prevent the spray paint can from clogging between uses. Before storing the can, clean the spray paint tip using a cotton swab or lint-free cloth dipped in mineral spirits, or acetone, or paint thinner. The acetone that’s sold in paint departments is typically more effective than other acetone-based solutions, like nail polish remover.
How to Fix Clogged Spray Paint Cans
If your spray paint tip is clogged, you will need to clean it. This cleaning process depends on whether the tip is removable.
If the spray tip is removable, twist and pull it off, then soak it in mineral spirits or acetone. After a few hours, wipe the tip of the nozzle with a lint-free cloth.
A tip for non removable tip, you can also clean it by wiping it with a lint-free cloth or cotton swab that’s been dipped in mineral spirits or acetone and worked to the tip.
A spray paint clog can interrupt your project, and you don’t want that. By taking steps to unclog spray paint can nozzle and prevent clogs from occurring in the first place, you can complete the job without delay.
Now let’s paint.
Spray cans pump out a lot of paint in a short time, this is all too easy to apply too much paint too fast, which then leads to over-spray on one spot and causes for the paint to run like tears, and it obscures details. Try to resist the temptation to cover the model with a solid, wet, coat at one shot, its so easy to over-spray — try to remember that this isn’t your cottage lawn furniture we’re painting!
Here we go:
When spraying, hold the can away from the model between 6” and 12“. The angle is not that important, if your aim is correct. Visualize the swaying motion to always keep the can moving, try a dry run at first; now point the nozzle at the model and press on the nozzle, that’ll start the atomized paint to come out of the nozzle and onto the model, you may want to consider what is the best direction of the spraying, along the fuselage? Along the body of the car, along the ship’s hull or crossways…. just remember to move the spray over the model, then release the nozzle off the nozzle.
What happens in between coats? the paint cures. If you add another coat during that time, you can run the risk of lifting the earlier coats, or even layering, and that’s bad.
Most times a light sanding of the previous coat can provide a better grip for the new coat. Sometimes, depending on the paint brand the following coat seems almost heavy, it isn’t, it just looks that way.
Keep the spraying light, in spurts, be sure to you keep the can moving and don’t start or finish your strokes on the model. Start away from the model and finish away from the model.
After you have finished applying the final coat, place the model on your workbench and cover it with a box or a tote. This will protect it and insure it has a clean dust free interior. This is to keep dust from falling on the fresh paint. You can also use a sprayer bottle to dampen the inside of the box with water. The box may not make a complete dry compartment, but it will prevent dust and lint from settling on the fresh paint. If it is gloss paint, leave it in the box for 2 or 3 days. Gloss paints take longer to dry. and nothing ruins a model’s appearance more than a glossy paint job with fingerprints.
More helpful tips:
Warm the spray can. Place the spray can in jar or cup with warm to hot water from your faucet, just for a couple of minutes.
DO NOT try to heat the can in the microwave!
Warm paint sprays better and more smoothly on primed surfaces. If you remember your high school grade 9 physics, a compressed gas cools as it is released, so warming the paint helps counteract this effect.
Do not use a rag or a cotton swab to remove dust particles from fresh paint! The fibers will stick to the paint and make a bigger mess.
You do not want to load the paint on too heavy. Check the model for runs after every pass. If you cause a run, stop! Applying more paint to even things out will only cause more runs. Here is what you can do: position the model so that the area with the run is horizontal, allowing the excess paint to spread over the largest area possible. Put the model under cover and don’t touch it for at least three days — that’s how long it will take for the paint to dry completely. Then you can sand it with 600 to 800 grit wet sandpaper, followed by either a rubbing compound or plastic polish or toothpaste.
In all cases if you discover a run after the paint is dry, try sanding it down with 600-grit wet-or-dry sandpaper followed by either rubbing compound, plastic polish, or toothpaste. That’s right, toothpaste contains a fine abrasive. It also gives you the freshest model on the table!
Timing.
There is an important time factor for successful spray painting. If needed, you should apply subsequent coats within 3 hours of each other. What happens in between? The paint cures. If you do have to wait 36 hours or so, then lightly sand the earlier coat so that the old coat can provide a better grip for the new coat.
Note:
As the nozzle is released, droplets of paint build up at the tip of the nozzle orifice, and they are carried by the spray, this is not a good thing; the idea is that you want the model to receive only fine paint droplets — those big droplets will cause uneven spots in the finish.
To combat that bit of a mess, your first coat should be a dusting that doesn’t quite cover the total surface. Your second coating should start away from the model, and in smooth motion bring the spray in onto the model and cover all the surfaces, this way the model will only receive the fine spray free of those larger droplets.
Also remember, the longer the spray the more paint ends up onto the model, and you’ll end up with a not so good finish. You need to be smooth, and quick and precise.
Maintenance
A good practice is to clean the nozzle (tip) after every use. When you are finished spray painting, turn the can upside down point it away from your work area, desk, anything that you don’t want to have a new coat of paint on, then press the nozzle for a few seconds. What happens is that the can is upside down and the paint will fall to the top of the can and clear propellant will travel down the siphon and out the nozzle, now you have a self-cleaning nozzle, and a clean nozzle clog free for next time.
Spray Diffusers:
It is a bit of a struggle to find spray can nozzles to mimic the spraying style that of an air spray gun with all the accessories, and a few companies have tried to provide this small accessory over the years, and for whatever reason after a while there is no diffusers to be found. Lately I found AK Interactive items 1028 and 1029 is still making the nozzle available in very rare quantities and different nozzle. Sure, you can search high and low and probably come up with industrial spray nozzle and other atomizers but suitable nozzles in a wide variety that one can use for modelling by using spay cans it does get challenging, but perseverance will have to win, stay with it.
Test:
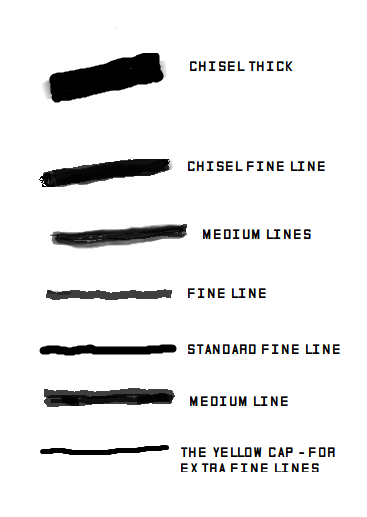
Items Tested: AK, part numbers: AK1028, AK1029
With these diffusers, you can adapt the spray cans to be used for a specific job, changing the spray diffusers to obtain different paint sprays, vertical strokes, thick, medium, and fine lines; chisel thick and fine high pressure, extra fine and even a nozzle with a built-in cannula for emptying the can. Together with these complements you will discover new possibilities in the spray can painting technique. All the test spraying was done at 6 to 10 inches away from the subject. The subject was a plain sheet of plastic to see if the desired effect was achieved. Practice, practice, you’ll get it.
I would like to take this opportunity to thank you for taking the time and reading my articles.
This is the end of Part 2; I hope you have found bits of information that can be useful for your next modeling project. Take care and stay healthy.
Thomas Ricci has been building model airplanes since the age of 12. When I reached the age of 14, he formed a club with the Royal Canadian Air Cadets Squadron in Toronto, and helped build plastic model airplanes for general displays.
Over the years, Thomas has continued to build aircraft and joined local modelling clubs within the Greater Toronto Area (GTA).
His skills are now focused on building Italian aircraft, and aircraft flown by Italian pilots and or engineered by Italian engineers. The main goal is to build the aircraft as historical accurate as possible with a story line.
A list of past and ongoing modelling participation by Thomas include:
-Peel Scale Modelers, Aerobuffs, IPMS Italy, IPMS Toronto
– Founder and President of the Club Frecce Tricolori of North America No117
– Participated in the MB339 aircraft model building and display representing the Frecce Tricolori PAN in Oderzo and Rivolto (UD) Italy (2012)
– Founder and Supporter of the Checkertails di Lesina, a monument dedicated to the U.S.A.A.F. 325th Fighter Group, Checkertails; Lesina (FG) Italy (2011 – present)
Second of two parts.
Previous Post: Part 1